Riding an electric skateboard has always fascinated me. The idea of owning a small, portable board that can whisk you from point A to point B is not only convenient but, comes with a sense of freedom and style—plus, the occasional nods of appreciation from passersby don’t hurt.
While we haven’t quite hit the “Back to the Future” hoverboard era, building your own electric skateboard is a solid alternative.

The big question
Can we make a DIY Electric Skateboard under a budget of $500, and can it be just as good? In this article, we’ll find out if we can do one better and add additional custom features that even top boards don’t have.
[su_note note_color=”#F5F5F5″ text_color=”#333333″ radius=”3″ class=”” id=””]
Introducing the DIY Electric Skateboard from Smartbuilds.io, it features:
- Top Speed of 28mph and Great Range of over 11 miles
- Extremely Light at under 13.2lbs
- Programmable lights
- Battery Status Indicator
- Dedicated Skateboard Key (Anti-Spark Plug)[/su_note]
This article would focus on building an electric skateboard that could go toe for toe against a commercial skateboard with prices well over $1300. We’ll take building a DIY electric skateboard from an electronics point of view.
Here’s the DIY electric skateboard video tutorial equivalent:

[su_note note_color=”#F5F5F5″ text_color=”#333333″ radius=”3″ class=”” id=””]
Disclaimer:
- Handle Development and Skating with care – You’re dealing with LiPo batteries there are high discharge batteries which could lead to a fire hazard if not handled properly. (We’re not responsible for any injuries occurred)
- Keep up to date whether it’s road legal to ride an electric Skateboard in your country.
- Always wear a helmet – that can’t be stressed enough.
[/su_note]
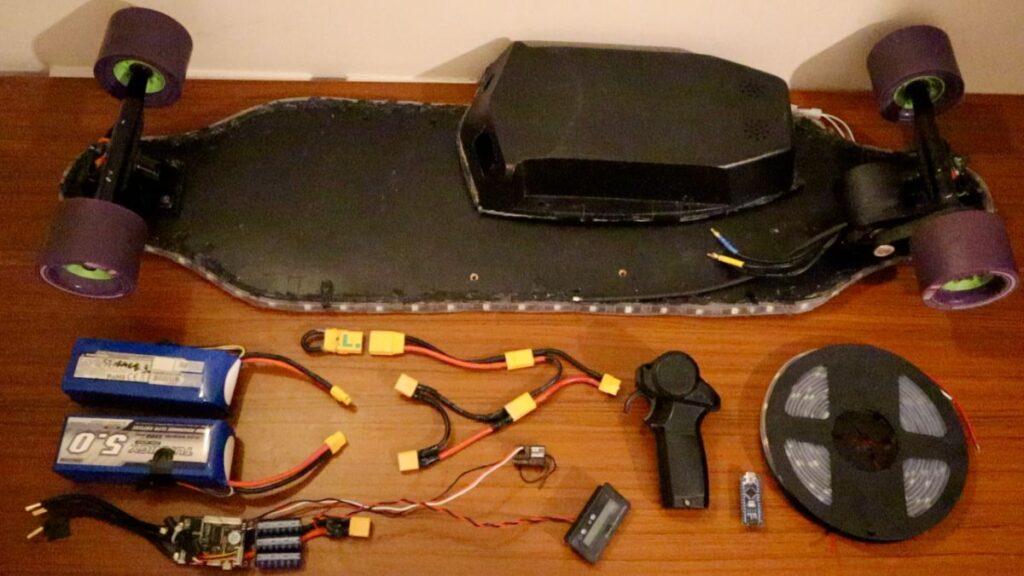
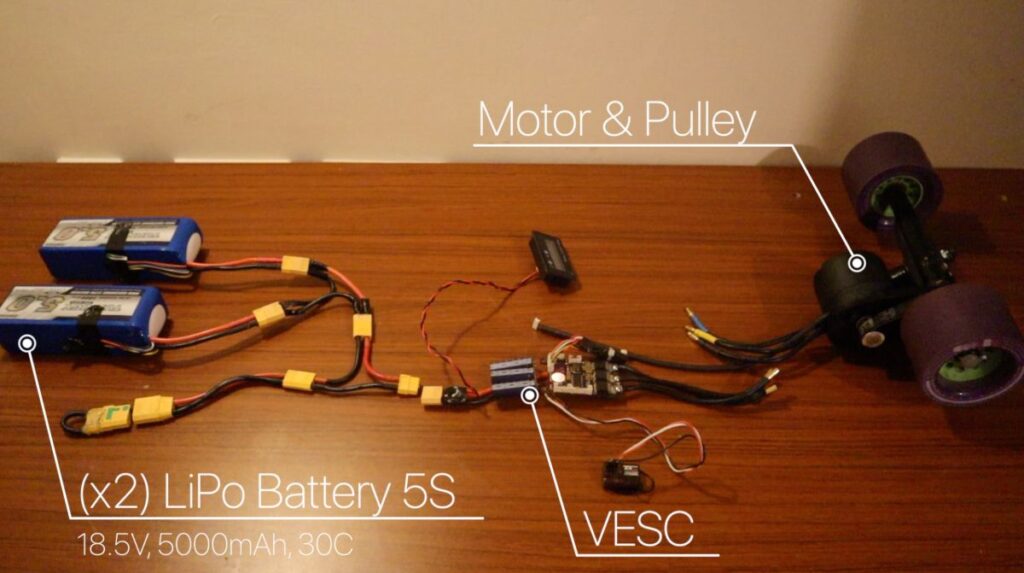
Part List – The main culprits
- Longboard 36”
- Wheel – 80mm wheel
- 190KV Motor
- VESC – Electronic Speed controller
- 2 x Lipo Batteries (5000mAh 5S 20C)
- 2.4GHz Remote & Receiver
- Pulley & Mount
Additional Kits: You may need a soldering iron.
| Parts | Retailer | |
|---|---|---|
| Longboard | ||
| Wheels | ||
| Mount & Motor Pulley System: | ||
| Motor (Flipsky 6354 190KV): | ||
| Wireless Remote and Receiver | ||
| VESC (Speed Controller) | ||
| Batteries: | ||
| LiPo Battery Charger: |
[su_spoiler title=”Other Parts” open=”no” style=”default” icon=”plus” anchor=”” class=”” ]
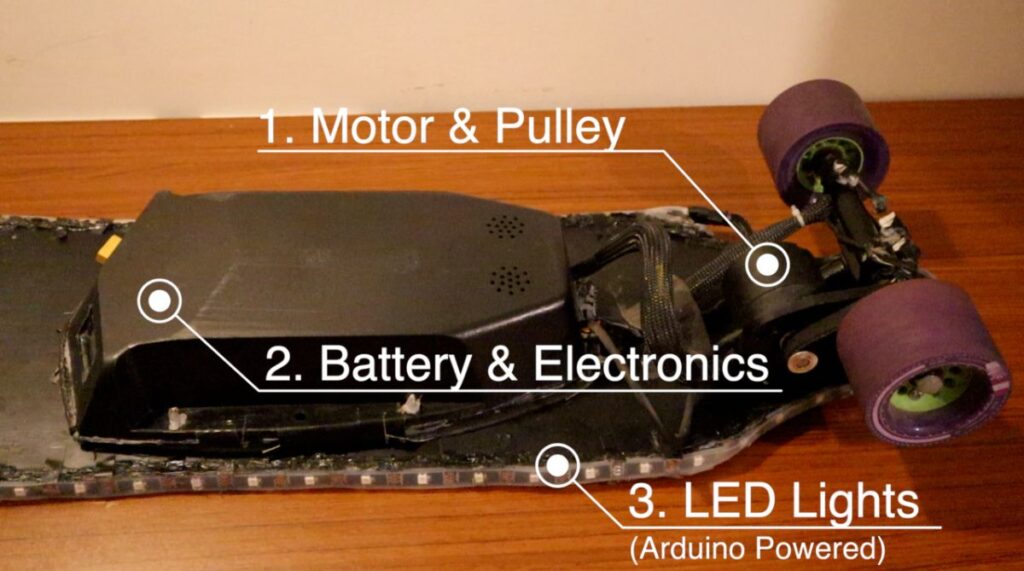
How it Works:

It’s always good to get an understanding of the overview first.
Ideally, an electric skateboard is a normal skateboard with a motor attached to a belt that propels the board forward. An RC remote usually controls this. In our example, we’re using a 2.4 GHz remote. Just like a normal skateboard, you can lean left or right like a normal skateboard to navigate your surroundings.
Ideally, there’s a small gear on the motor shaft and another larger Gear on the Wheel. The Motor turns the smaller gear, which in turn pulls the belt, and the belt pulls the Wheel. The Gear ratio is an important factor for speed.
“Personally, building an electric skateboard is similar to building a PC. The great thing about it is that there is a lot of options to choose from. The bad thing is that there is a lot of options to choose from.” – ESK8 Builder
Like a PC, you would need to take into account trade-offs.
Know your trade-off
A bigger motor may provide more torque, which would be helpful for inclines but may not be the most ideal for traveling around faster on a flat surface. Likewise, a bigger battery would give you an increased range, but that may increase your board’s weight.
Overview of the Board
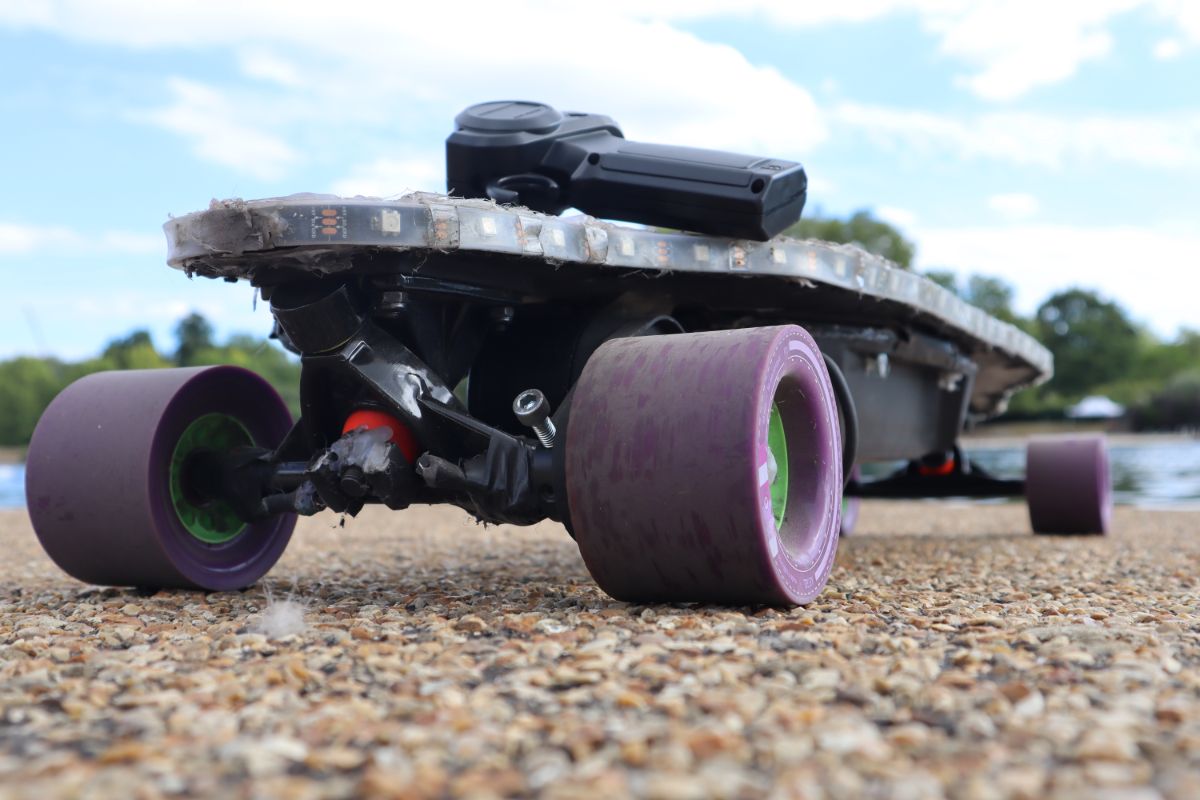
The board that is being used is a 36” Longboard.
Longboard provides for better stability and larger ground clearance. The current board weighs around 3.5 kg (7.7lbs).
Trucks and bearings – The 10″ Caliber Trucks and Red bearings ” are used on this build.
- In the aims of building an electric skateboard, a few modifications were first made to the board.
- Adding Riser Pads – This would help reduce board vibration and give you the additional clearance of the deck from the ground.
- Drilling Holes for Container – These holes would be used to thread a crew in to keep the Electronics enclosure in place securely.
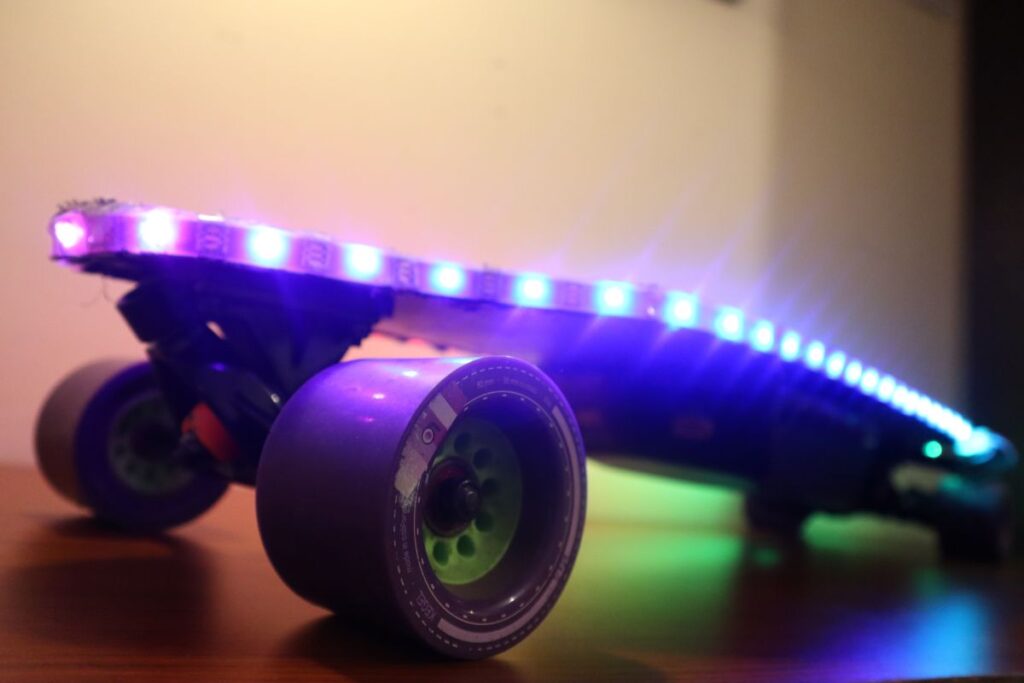
- LED Light Strips – The RGB WS2812B was added around the board with a hot glue gun.
More on the Parts: Motor, Drive & Batteries
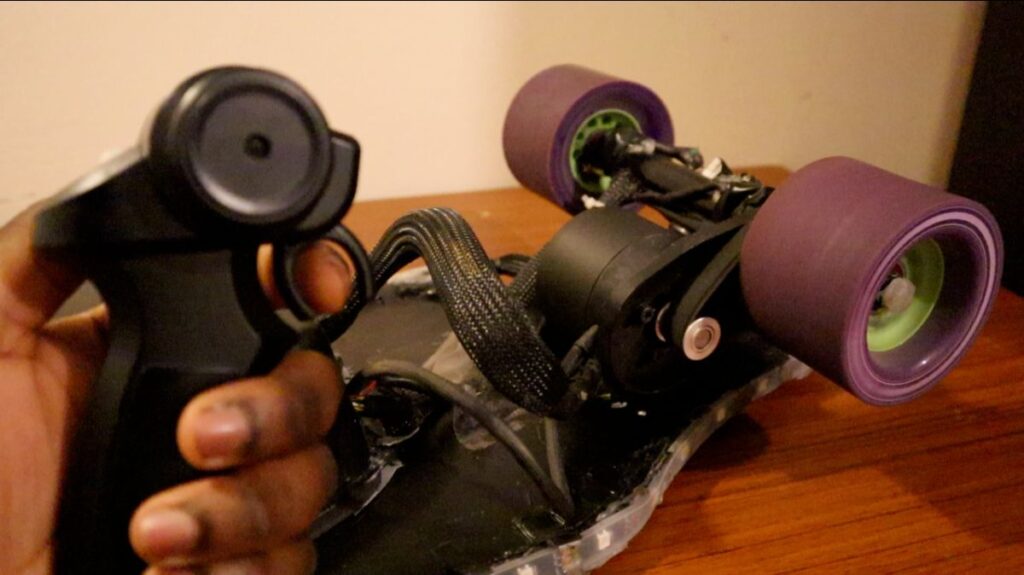
BLDC Brushless Motor – The Flipsky 6354 190KV, 2450W BLDC Brushless sensored Motor was used. This usually comes with a fourth cable that can be plugged directly to the ESC. The ESC via the sensored Motor can detect the Motor’s position, helping for a smoother efficiency of your Motor and a smoother start-up.
[su_note note_color=”#F5F5F5″ text_color=”#333333″ radius=”3″ class=”” id=””]
Note: A singular motor is more than enough to propel the board forward. However, a dual-motor setup is also possible for more power but would increase the cost of building the board. [Explain the KV and Torque]
[/su_note]
Mention Motor type – You want a Brushless Motor with high KV and Torque
Belt Drive vs. Hub Motors – There are two main belt types Belt Drive and Hub Motors. This build uses belt drive motors. However, as an alternative hub motor has a motor integrated into the Wheel – think of hoverboards.
Battery – In our example, we’re using 2 x 5S LiPo Batteries. Each Battery has a voltage output of 18.5V. Connecting these batteries in series would provide a total output voltage of 37V and an increased capacity.
LiPo batteries are ideal Battery for their high discharge relative to their weight and size. However, these batteries must be stored and handled with care to avoid fires or other damages with high voltages. I.e., avoid overcharging LiPo batteries and properly balance charging the batteries you should be fine.
- Remote & Receiver – Any 2.4GHz receiver would be ideal. The example we’re using is designed for RC; You could also use smaller pocket size remotes.
Assembly of Pulley
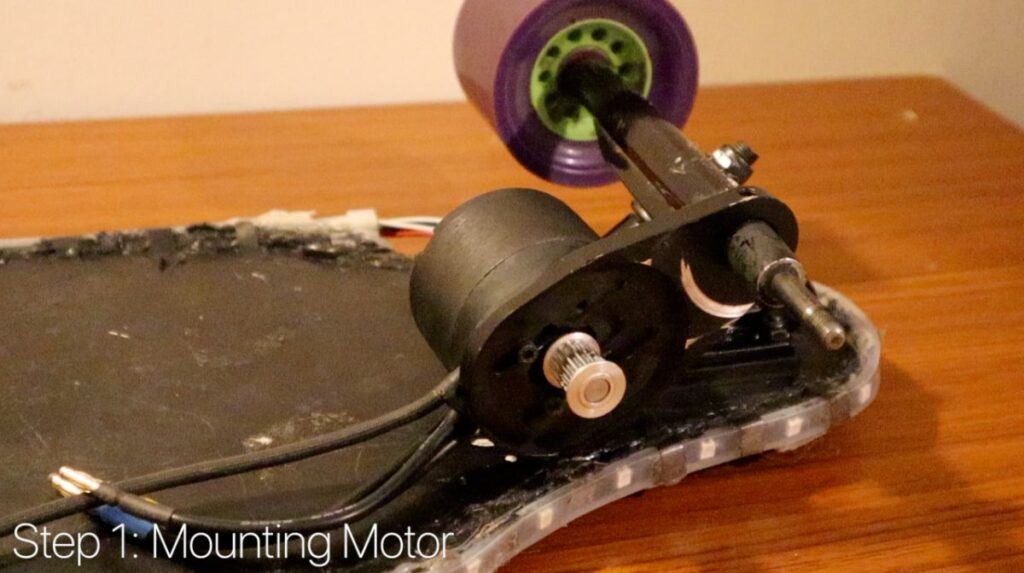
Pulley & Mount – In our build, we used a 36:16 teeth pulley reduction connected to a timing belt. The Mount is what would be used to mount Motor to the truck. The pulley is a propelling system that would cause the wheels to rotate by the Black timing belt. As the Motor rotates, so does the Wheel.
The timing belt used: HTD5 225mm x 15mm.
Let’s go into more detail:
The larger gear would be screwed onto the 80mm orangutang wheel. The Wheel (80mm or larger would be ideal) – wheels Kegel Orangutang comes with a plastic hub space already designed for Pulley System. It’s essential to know the wheel size. Some mounts and gears are only compatible with specific wheel sizes.
The smaller 16 tooth gear being is now inserted and screwed on the motor shaft.
You can choose to adjust the position of the Motor, pulley, and shaft with the supporting screws.
Note: You can use thread lock to permanently lock the position of screws and provide protection against rust and corrosion.
Assembly of Electronics
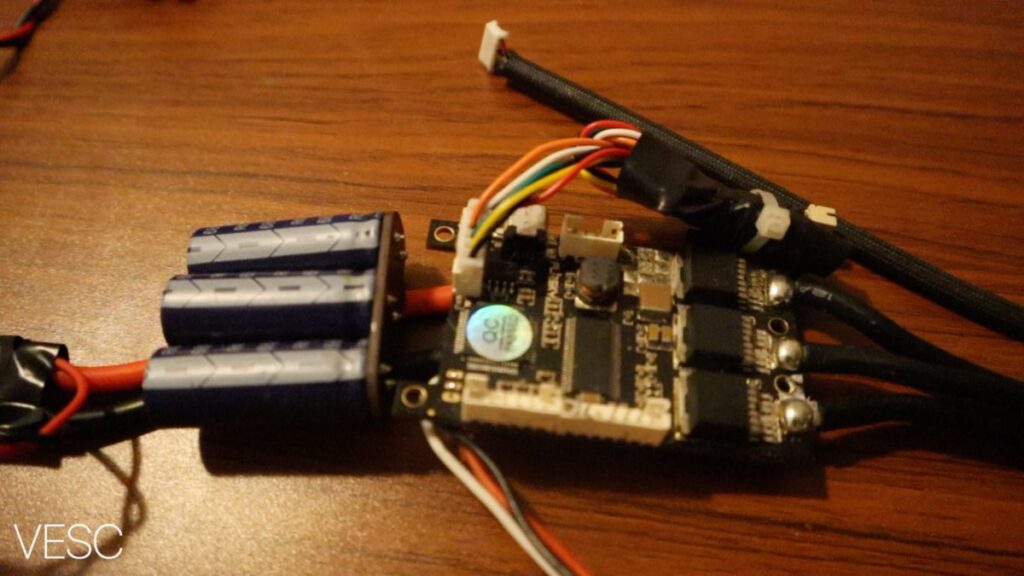
Introduction to VESC – The ESC (Electronic Speed Controller) is the brains of the board. It’s essentially a piece of hardware that connects to the Motor (from the Battery) and regulates the Motor’s power output based on the input given by the remote.
Typically ESC comes with a Remote and receiver. In our example, we’re using a VESC created by Ben Vedder. This is an open-source programmable ESC (More on this late). A good quality ESC is definitely worth the investment. Look for an ESC that can accommodate the current output of your Motor.
Battery Status Indicator – The Battery Status indicator works as a Voltmeter where the +’ve (Red) and -ve (Black) were soldered to the +’ve and –‘ve of the VESC respectively. The battery indicator would then turn on anytime the board is connected.
How the Electronics is Assembled (In Steps)
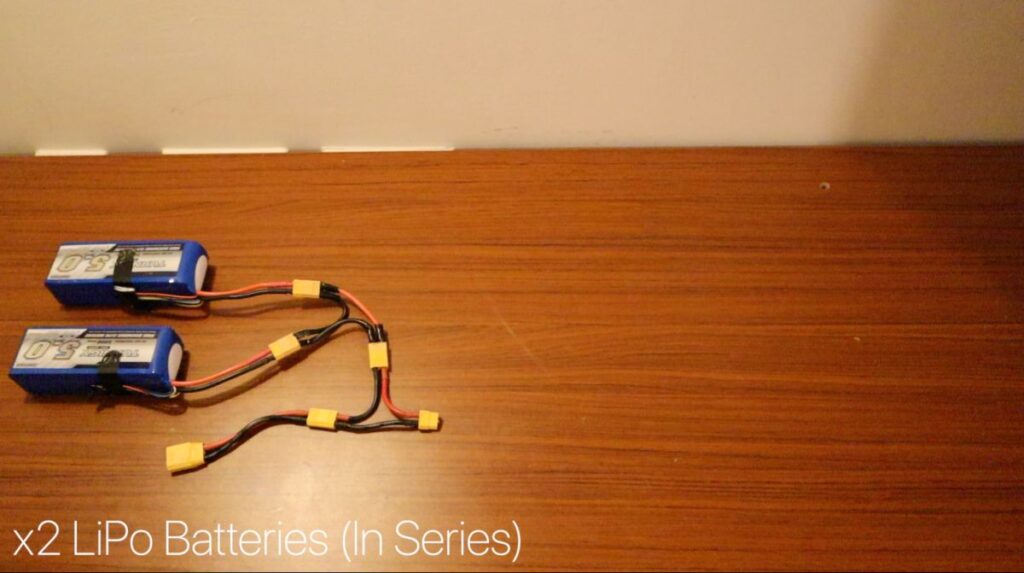
Step 1: Connecting your LiPo Batteries in Series – Firstly, the 2 x 6S1P LiPo Batteries (18.5V) are connecting in series using XT60 Series connectors. This now gives us a total voltage output of 37V, 10S at 5000mAh.
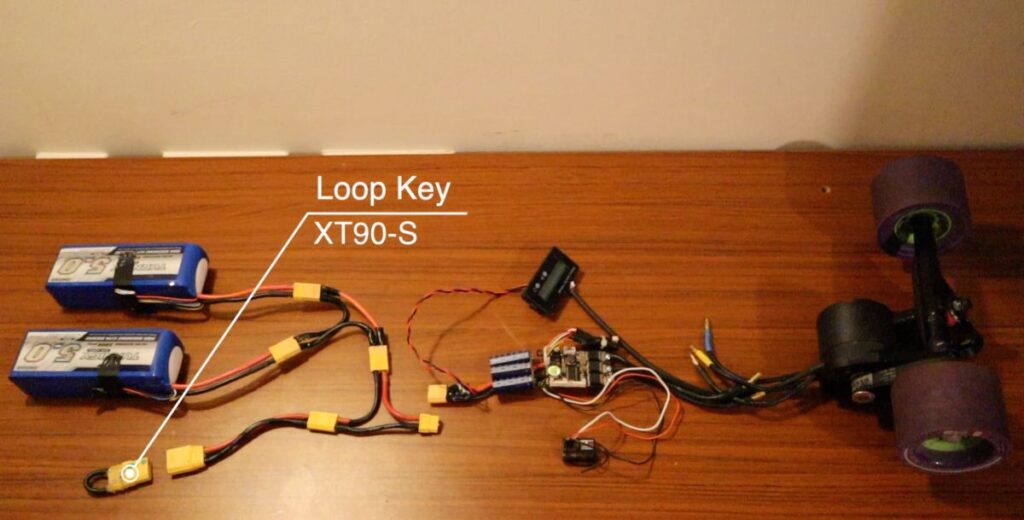
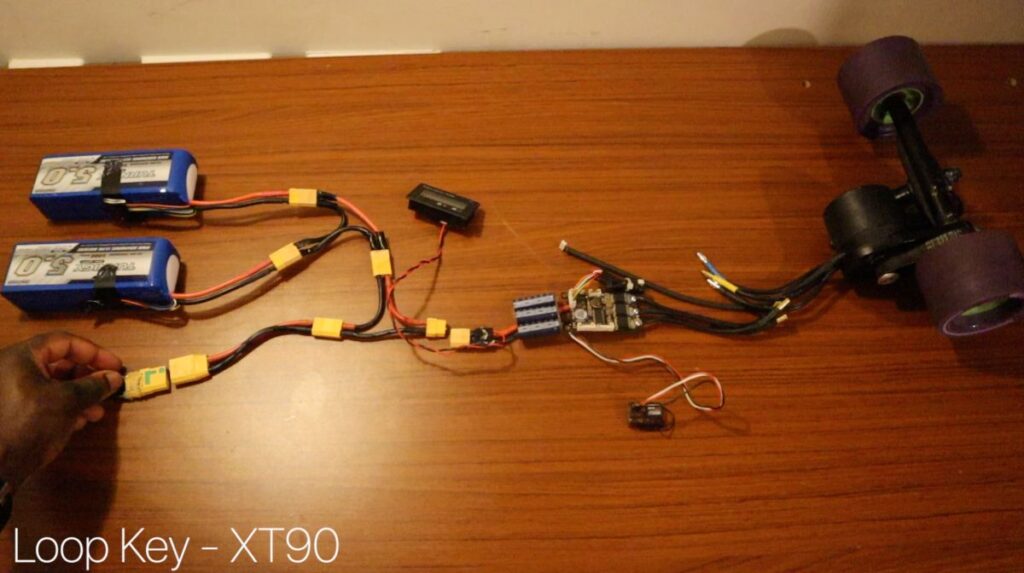
Step 2: Creating the Loop Key/ Anti-Spark Plug – We’re going to put this in series with an XT90-S Anti Spark plug/ Loop Key. This would be used as our physical Key to complete the circuit connection and start-up the Electric Skateboard. The Anti Spark plug serves two purposes:
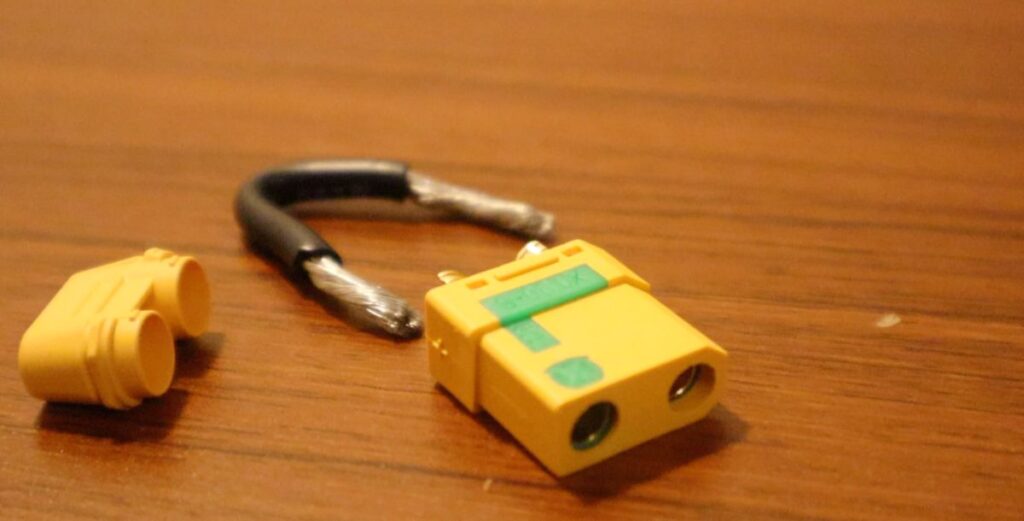
Step 3: This can be created by soldering a 12 AWG Cable to both ends. Optional – Anti Spark Plug Switches are also an option, however having used this. I personally prefer to know my electronics are permanently disconnected when not in use.
- Keep a physical disconnect when not in use to avoid battery drainage.
- Prevent a mini spark each time the Battery is connected to the VESC. (This is normal)
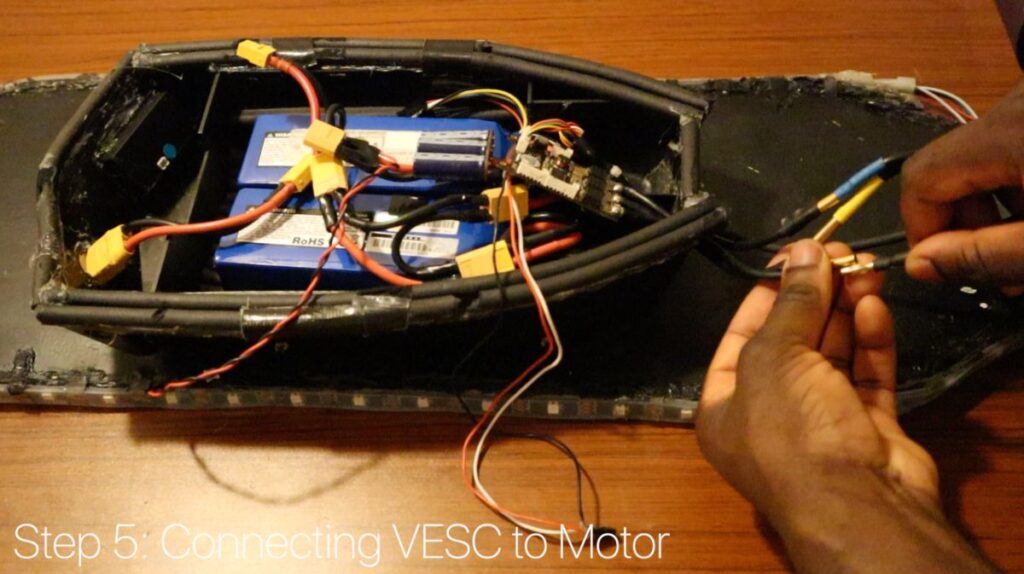
Step 4: Connecting VESC to Motor – Before connecting your VESC to the Battery, you would need to connect the 3 phase pins of the Motor to the VESC.
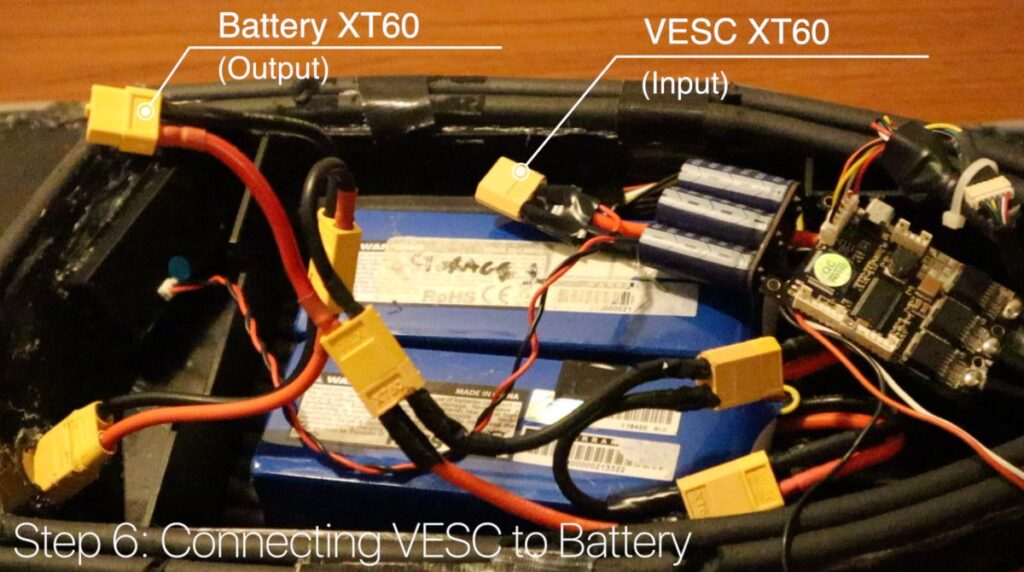
Step 5: Connecting VESC to Battery – The VESC can now be connected to the Battery. Assuming you’ve built in an external Loop Key (from step 2), you’ll need to connect the loop key to complete the circuit. The full-electric circuit for the electric skateboard is now complete – you can verify that you’ve connected it correctly by observing the small LED light on the VESC.

Step 6: Clean up the wires – This is not a necessary step but advisable for sanity. Arrange the wires, so that makes the most sense for you. Also, make sure that there are no exposed wires that can lead to short circuits by insulating them with electrical tape. Further cable ties and using braided cable sleeves are great from protecting the board against the outside dust and wear and tear.
You’ve now got a functionally working electric Skateboard.
Arduino Programming
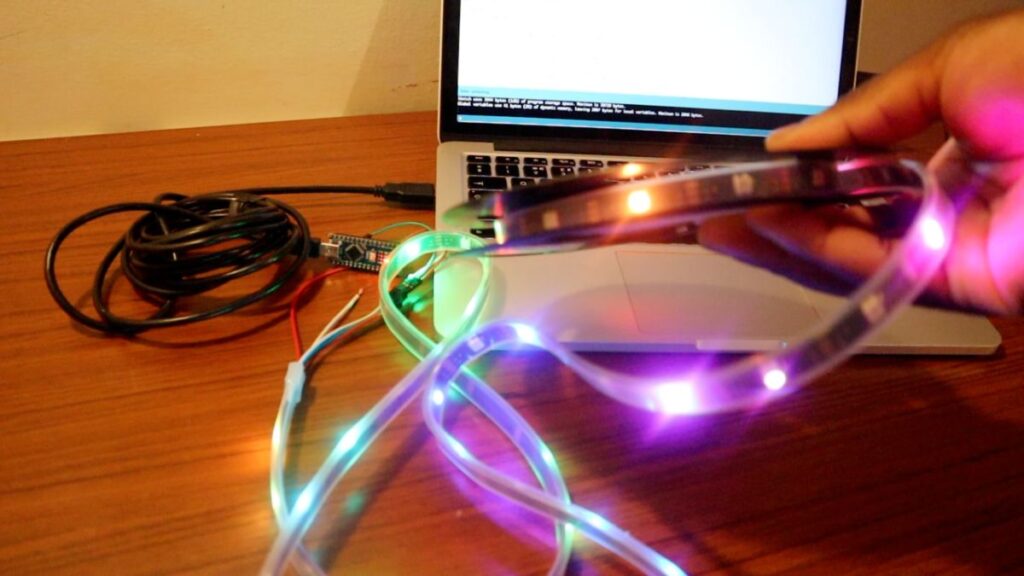
This is an optional step; however, adding programmable LEDs would help in simulating car lights and indicator lights for nearby motorists.
The LED Strips (WS2812B) can be programmed by an Arduino, in our example, we’re using an Arduino Nano, it’s a powerful microprocessor which takes very little space in the container.
Also, with an Arduino, we could make the board more smart – think of Bluetooth, connecting to other devices, e.g., phone – the applications are endless.
Download the latest Arduino IDE.
Once you’ve set up your Arduino environment, to upload the code to the board within the Arduino IDE, head off to Tools -> Manage Libraries. Search for the Library “Adafruit NeoPixel” and ‘Install.’
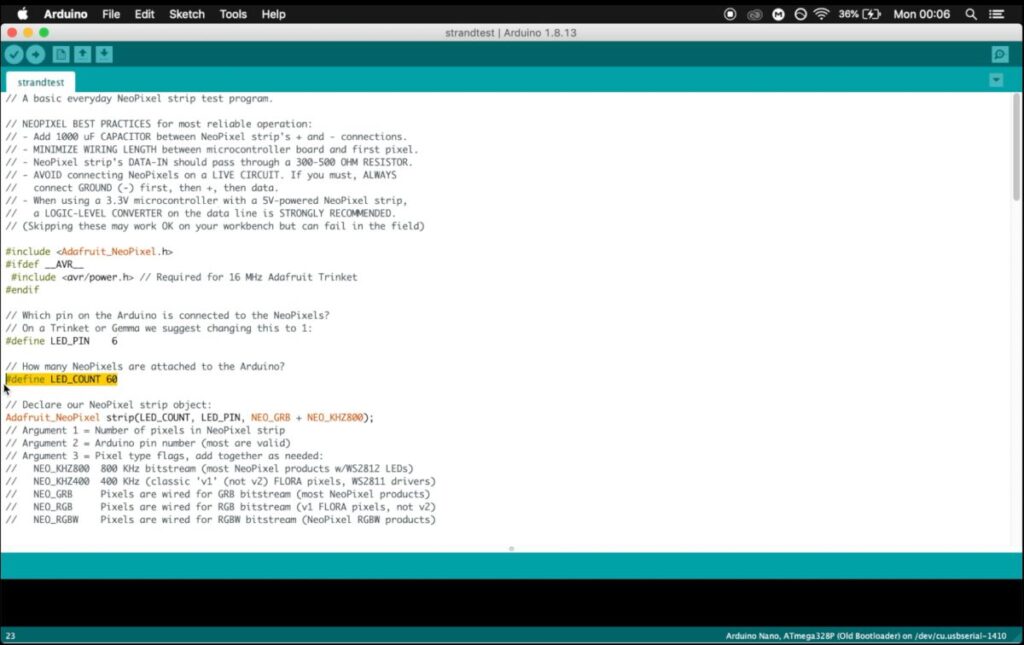
This library would provide a good amount of examples to program the RGB WS2812B strip. Get the example by going to Files -> Examples -> AdaFruit NeoPixel and the ‘stradtest’ example.
#define LED_PIN 6 -> The Digital Output Pin the LED Strip is connected to
#define LED_COUNT 60 -> How many LEDs should be programmed, e.g., 60 LEDs
The code to make sure no errors and upload to the Arduino Nano. The LED sequence would immediately display on the board.
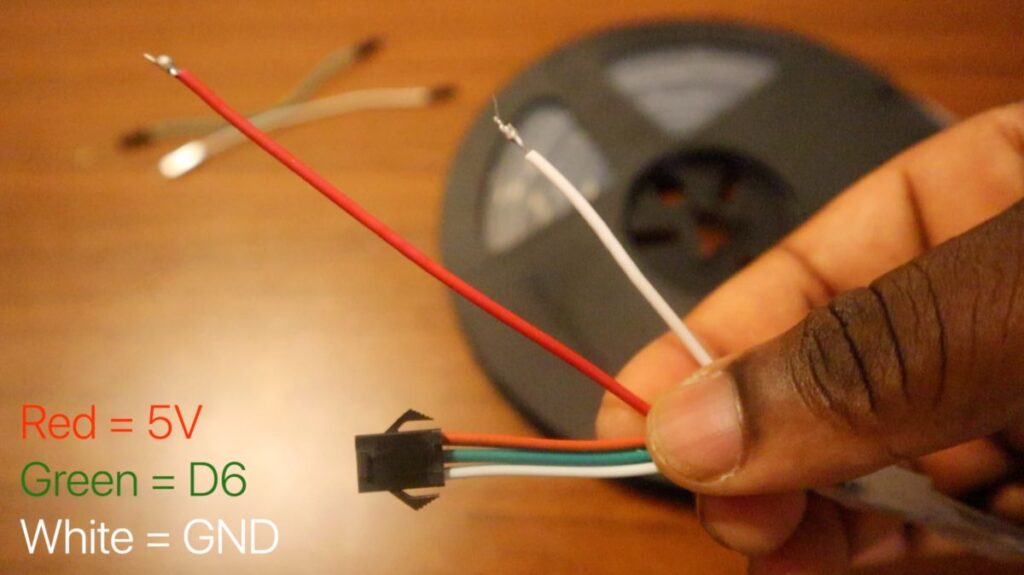
The below diagram is the setup of the Arduino with the LEDs. You can also put this setup on the breadboard and power through the VESC UART port. The two Red (+ VE) and White (- VE) Cable would be connected to 5V and GND respectively on the UART port.
That way, any time the board is on the LEDs would automatically turn on too. This works well since everything is well integrated. However, this would need a bit of soldering.
Configuring the VESC
Unlike other plug n’ play ESC, the VESC needs to be configured to the Motor as well as the remote. This can be done via the VESC tools. The full video tutorial details how to set up your VESC via VESC Tools Software. (Supporting Mac and Windows).
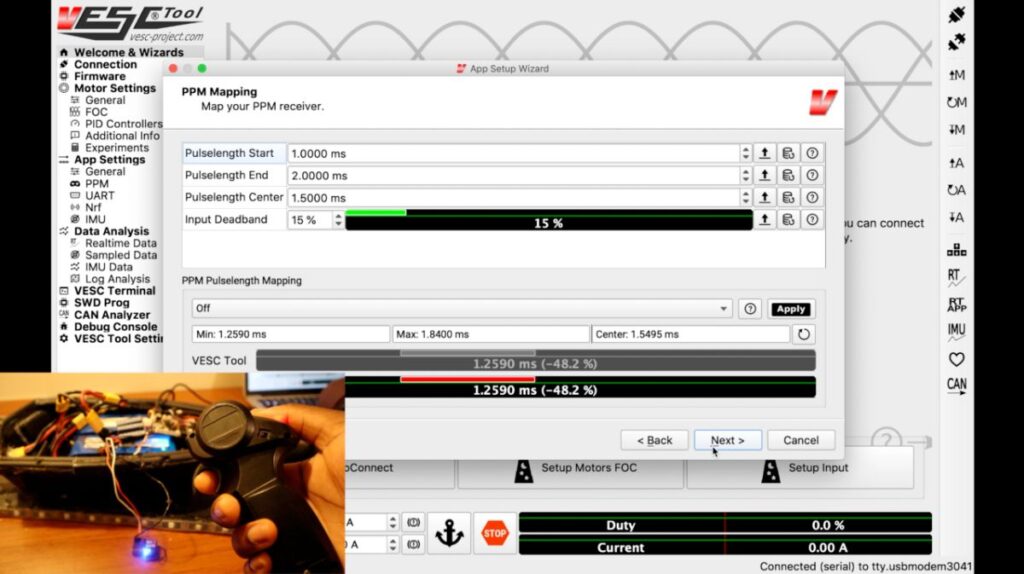
VESC tool is a BLDC tool that can be used to program your VESC Hardware via the GUI. There is a myriad of features you can program through the UI onto the hardware. For now, what we’ll focus on is:
- Tuning the Motor & Battery to the VESC via Motor Setup Wizard
- Calibrating the Remote to the VESC via Setup Input
Download the latest VESC Tool via GitHub.
Note:
- Connect your VESC to your PC via USB Cable (Typically Mini USB-B)
- Make sure you have a stable/constant power supply when programming the VESC to avoid any complications from unexpected shutdowns.
Verdict – The DIY Electric Skateboard Performance
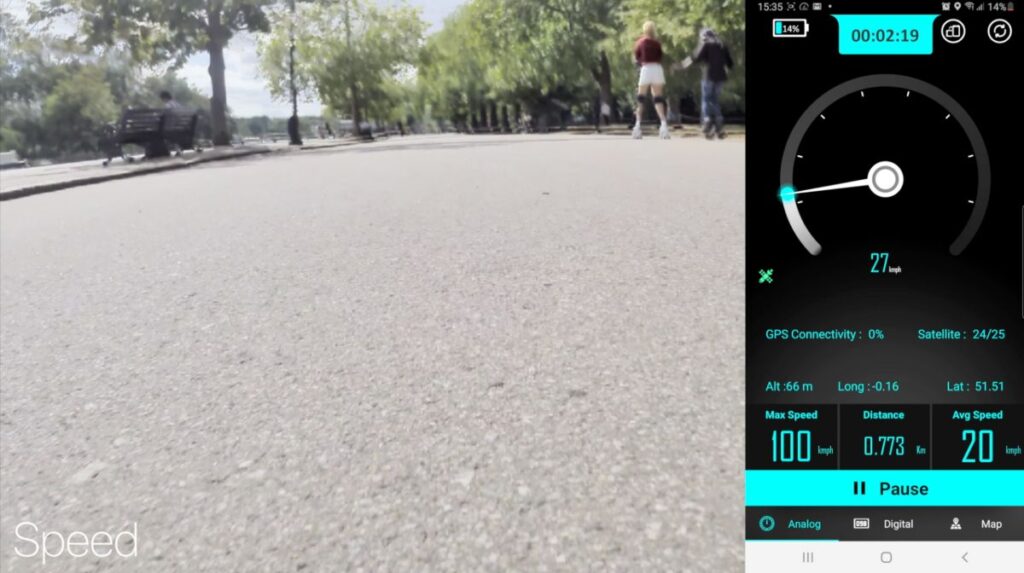
- Speed – Although this Skateboard is faster than a boosted board and has the ability to climb steeper inclines. When it comes to Electric Skateboards, 23mph should be more than enough. It’s not much to brag about since the boosted board is already fast enough. And traveling at speeds of 25mph can be insanely dangerous.
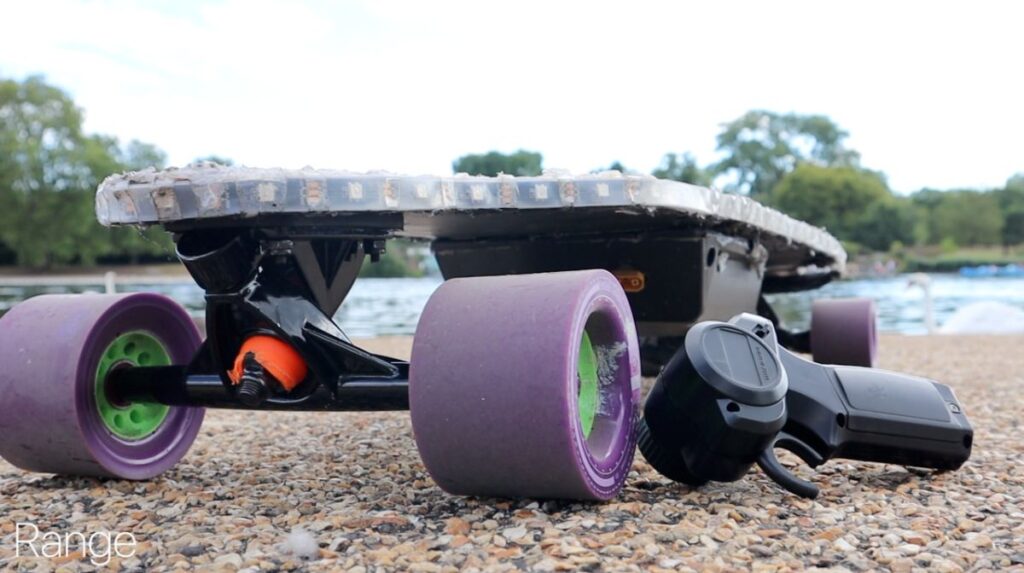
- Range – Using the 2x 5s (5000mAh) LiPo Batteries in series was a good call. The additional capacity for a range of 11 miles with a slight increase in weight was ideal for my build, taking to account each Battery weighs about 500g.

- Weight – The electric skateboard weighs in at 13.7 pounds, which is relatively light compared to other boards. An extra 6 lbs came from the Electronics and motor system. The additional 6 pounds to make the board go 11 miles on a charge at a max speed of 25 mph is a good trade-off for me. And it’s still lighter than most electric skateboards.
| DIY Electric Skateboard | Boosted Board V2 | |
| Range | 11 Miles | 6-7 Miles |
| Weight | 13.7 lbs | 15 lbs |
| Speed | 28 mph | 22 mph |
| Cost | $350 | $899 |
Is building an electric Skateboard worth it?

If you’re into DIY, and like maintenance, engineering, and tinkering… adding features, etc. it’s worth building an Electric Skateboard for a fraction of the cost. However, If you want a reliable board and that’s all – Buying a board would be the best option.
Building your own electric skateboard can be very rewarding and also challenging. You own your board, and you know the ins and outs. You can upgrade and even make other boards with your new-found knowledge and experience. But just it’s DIY doesn’t always mean cheap.
Similar to a custom PC getting the best parts would max out your board in performance in every way, but this doesn’t mean it would be cheap. However, it can also be seen as an investment that is worth the payoff.
Most of all, do your own research, building an electric skateboard can be a time-consuming process. In order to get your questions answered, consider joining an esk8 community is an excellent start as the first step for support.
Next Steps:
Several parts of this board can be improved, such as adding a dedicated BMS to charge the LiPo batteries without a balance charger & power supply. Even possibly adding some smart connectivity to your phone. That’s the problem going down the DIY rabbit hole; The ideas are endless. So, where will your DIY electric skateboard journey take you next?
[su_note note_color=”#F5F5F5″ text_color=”#333333″ radius=”3″ class=”” id=””]
If you would like to support my projects, consider supporting my Patreon page.
Alternatively:
[/su_note]
First!