Overview
The world of autonomous delivery is no longer a distant fantasy—it’s quickly becoming a reality. From rapid advancements in same-day deliveries to the rise of food delivery robots, the future of autonomous package delivery is unfolding before our eyes.
As e-commerce giants race to keep up with growing demand, the idea of Autonomous Drones delivering small packages to your Doorstep isn’t too far off reality.
Companies such as Amazon and Starship Technologies are pioneering solutions in such spaces. With the likes of Amazon Scout Robot.
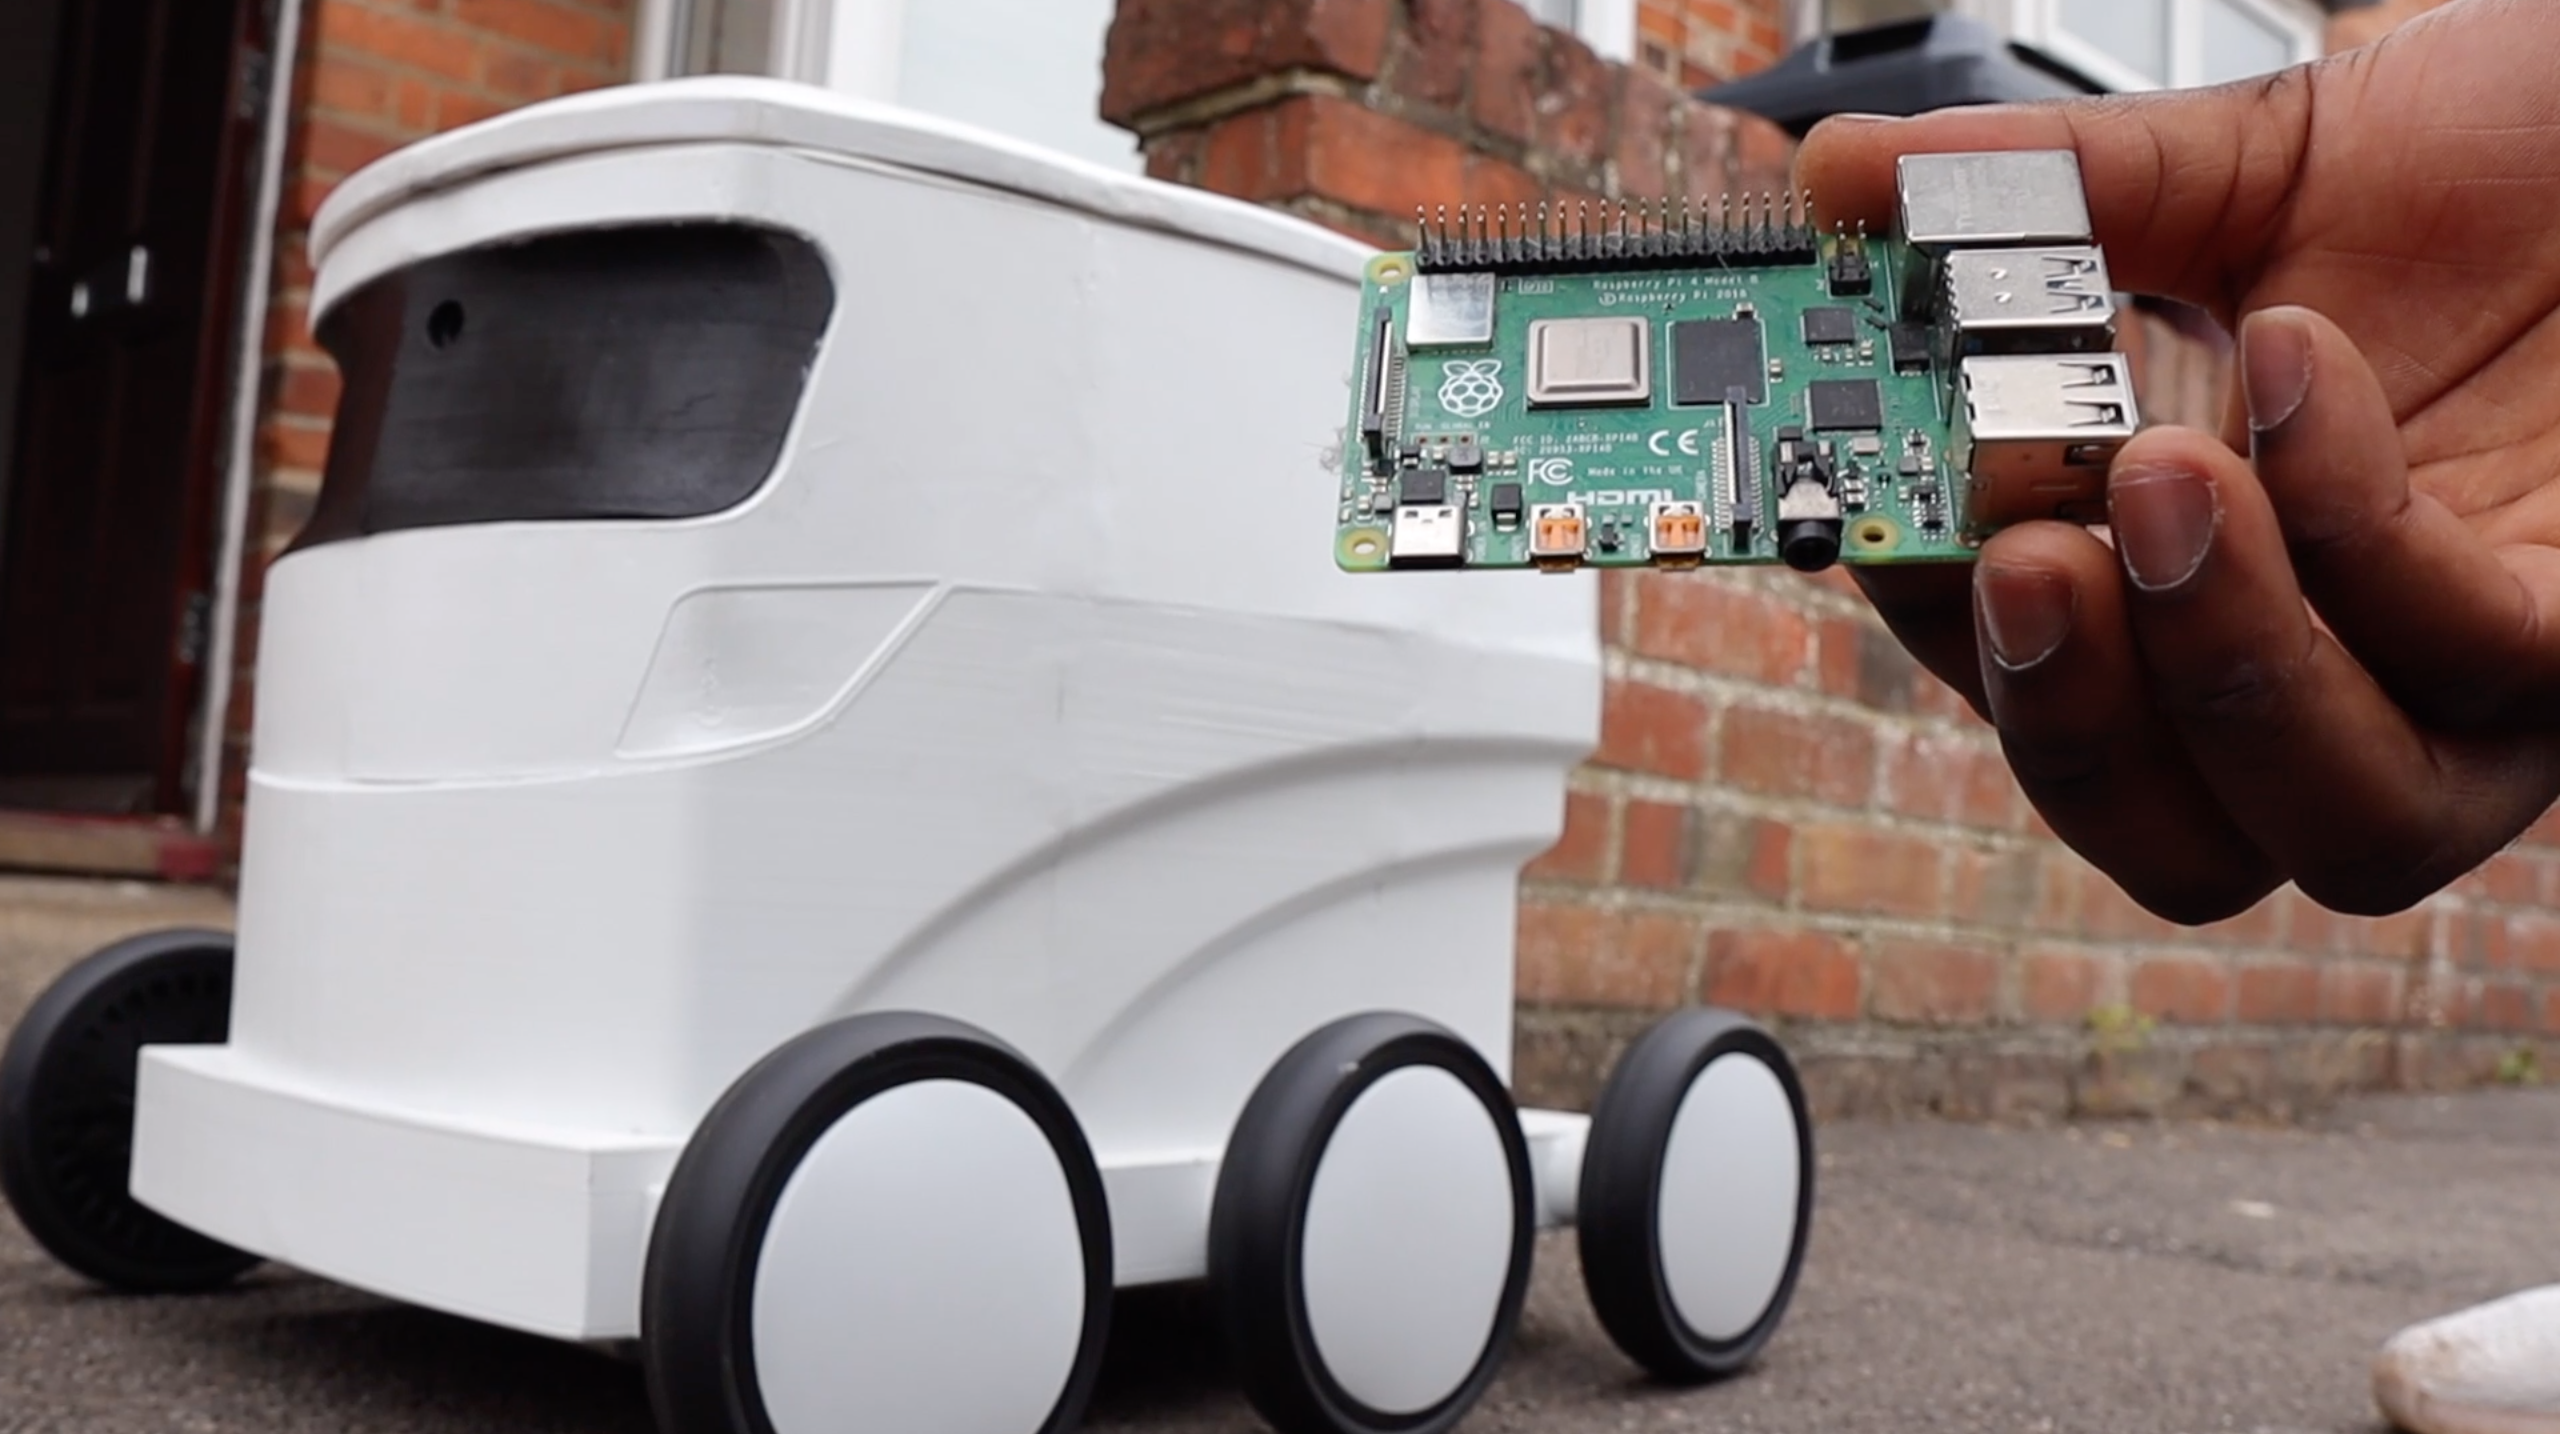
Imagine if we could build an Autonomous Robot that can also be controlled remotely from anywhere in the World, using a Raspberry Pi and Arduino. Well, this project is an attempt at building such a solution. Introducing Droiid.
Introducing Droiid:
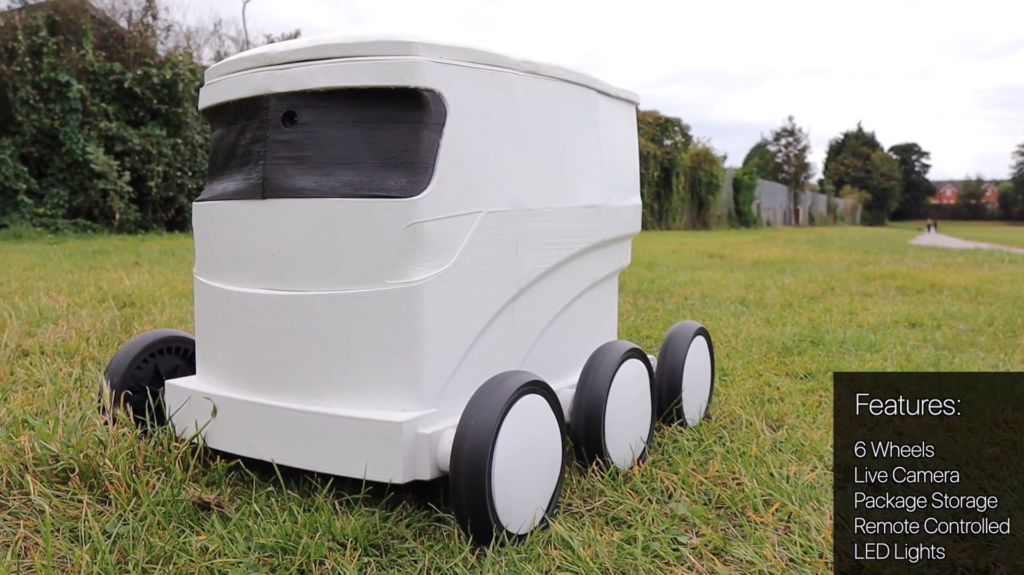
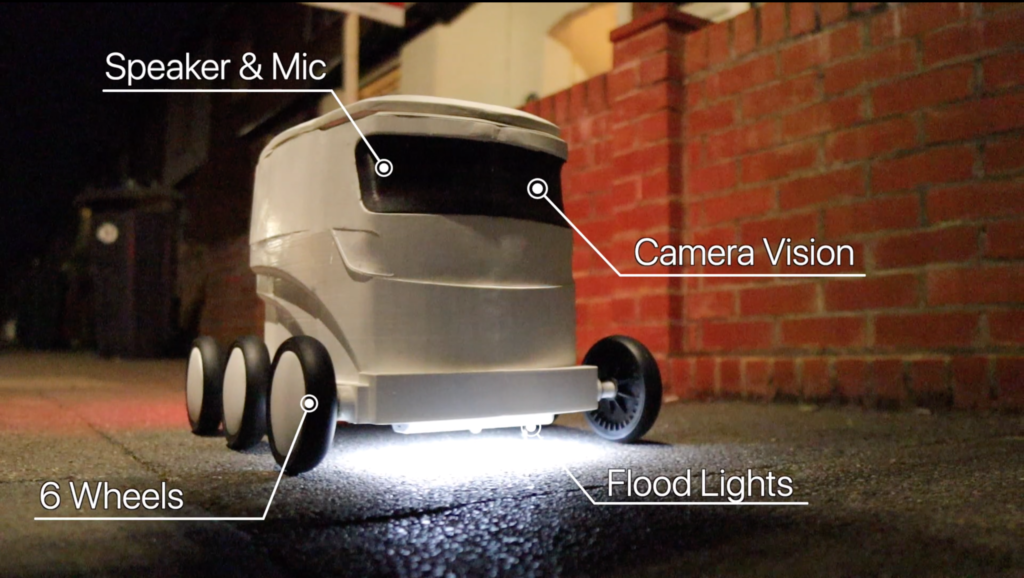
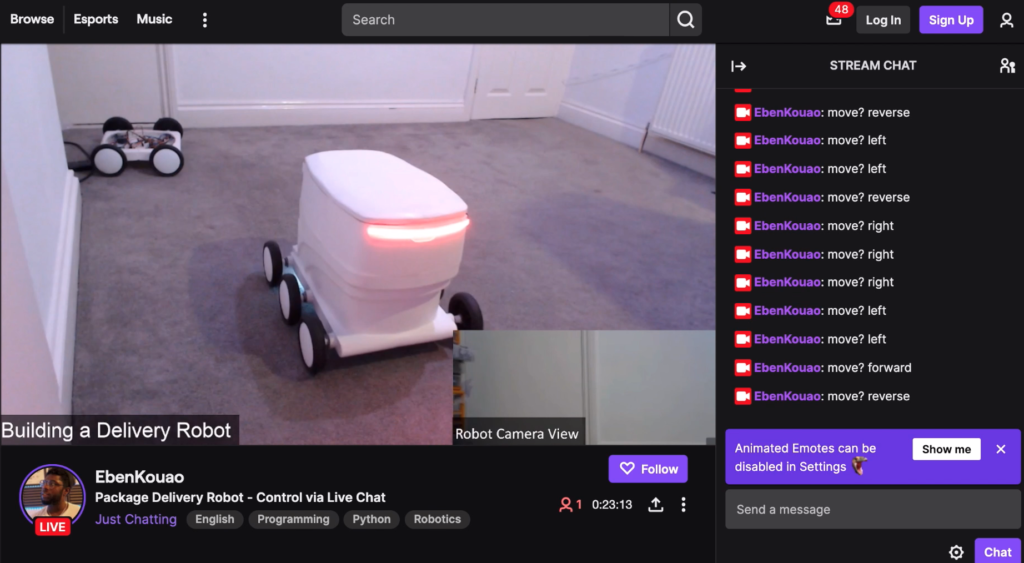
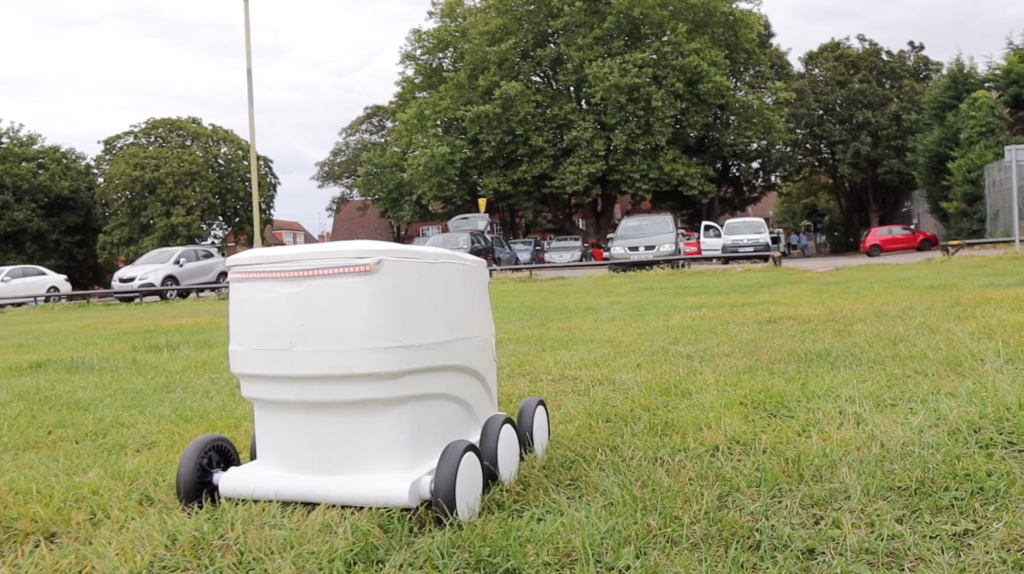
Droiid is a six-wheeled Ground Delivery Robot designed to deliver your packages to your Doorstep. The Delivery Robot can be programmed to be an autonomous Self-Driving Robot, or you can control it from a Twitch/YouTube Livestream.
[su_note note_color=”#F5F5F5″ text_color=”#333333″ radius=”3″ class=”” id=””]
Droiid Features:
- Autonomous Control
- Controlled via Livestream (from anywhere in the World)
- Deliver Package to your Doorstep (up to 10kg)
- LED Turn Signal Indicators
- 6 Wheeled Drive
- Text-to-Speech Capabilities
[/su_note]
This article aims to build a Robot (from scratch) that you can control via Livestream chat with Text to Speech Capabilities. I.e., you can control Droiid whether it’s indoors, outdoors, or you’re on the other side of the World.
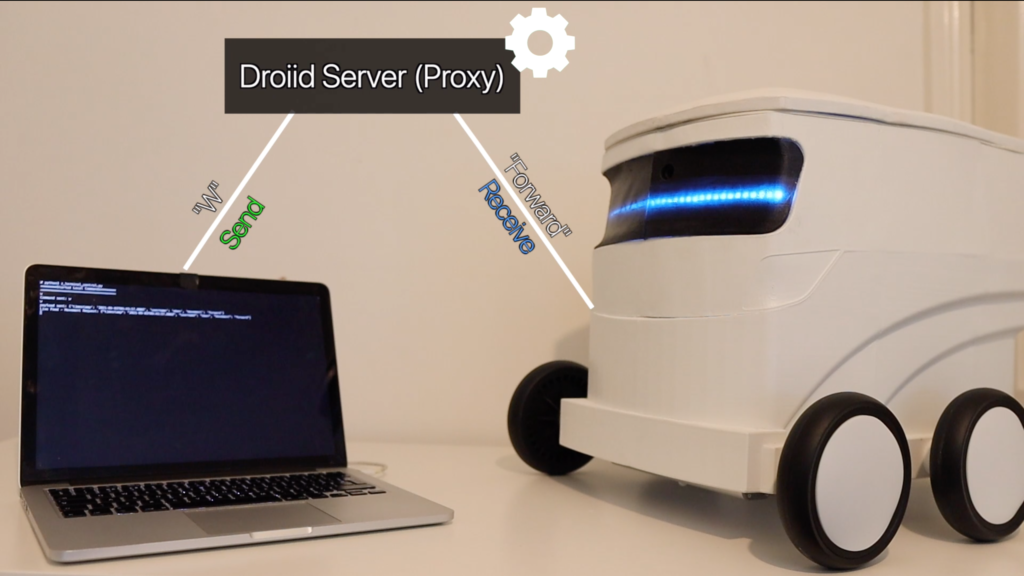
How it Works – How to control Droiid?
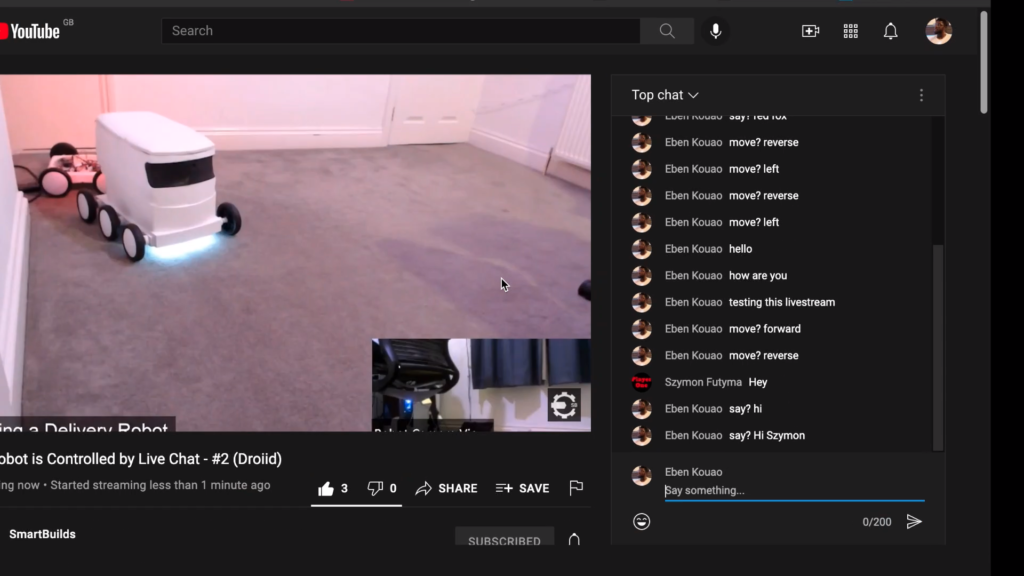
- A User writes a Robot command (as a message) in the live chat to control the Robot e.g., “move? Left” either to Twitch or YouTube.
- The message is received by the Droiid Server (via Websockets)
- The Droiid server validates and parses the message as a JSON object and sent to the Pi
- The Raspberry Pi (running a Web Server) receives the message and perfroms an action.
The Raspberry Pi acting as the Orchestrator communicates with all components of the Robot to perform specific functions:
- 1) Communicates with the Raspberry Pi Speaker to say the message (via text-to-speech)
- 2) Relays the message to the Arduino (via USB connection) to execute a function controlling the Motor.
In addition, the advantage of a Raspberry Pi allows us to attach a webcam, speaker, and Mic module, which we can use to stream the Robot’s vision to view on live stream interface such as Youtube Live/Twitch.
As a result, allowing us to view a Robot’s current position and navigate its surroundings with Audio feedback. That means you or I can control the Robot from any part of the World, using any device connected to the internet.
How the commands works:
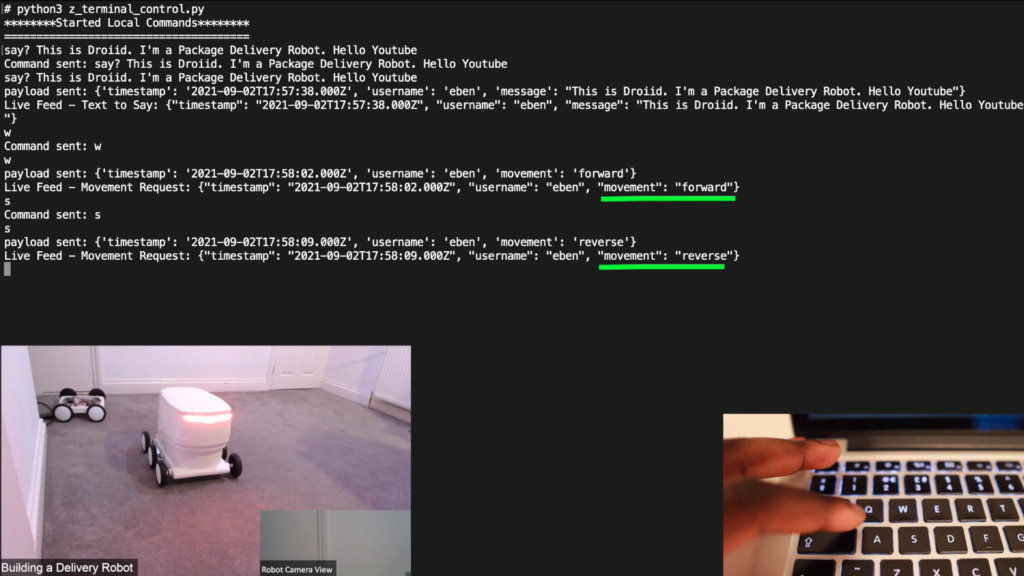
E.g., To make the robot talk, using TTS (text-to-speech), start your live chat message with the command “say?”.
For example:
Text Command: "say? Hello, my name is Droiid".
Action: Robot will say, "Hello, my name is Droiid."
The droiid server picks this command and executes an action based on predefined rules.
Additionally, to move the Robot, start your live chat message with “movement?”.
For example:
"move? Left" = Robot will turn left
"move? Right" = Robot will turn right
"move? Forward" = Robot will move forward
"move? Back" = Robot will move backward
Note: Further functionalities can be provided, e.g., Turn lights on “lights? on” or using WASD Commands.
Droiid – Robot Fundamentals
To understand how Droiid is built, let’s break down how a typical Robot works.
[su_note note_color=”#F5F5F5″ text_color=”#333333″ radius=”3″ class=”” id=””]
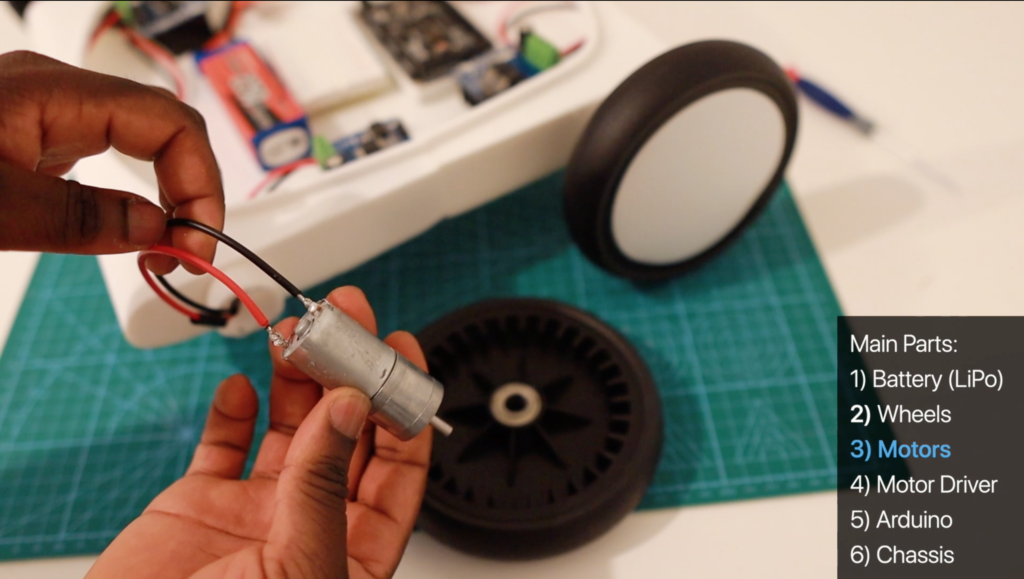
The main components you’ll find in a Smaller Wheeled Robot:
- DC Motor
- Motor Driver
- Chassis
- Wheels Battery
- Microprocessor
- Wiring & Tools
[/su_note]
A typical Wheeled Robot Car consists of a stable basis chassis. With 4 Motors mounted onto the Chassis.
The Motors are regulated and powered by a Motor Driver drawing voltage from Battery.
Whereby, the Arduino works as the Brain and controls the logic. As a result, controlling the Motor’s direction (Turning Clockwise or Anti-Clockwise) and the PWM signal supplied to the Motor (controlling the Motor Duty Cycle) for Speed.
The below Diagram provides a smaller replica of Droiid that can be programmed to perform the same tasks.
Here’s what mini droiid looks like.
[su_note note_color=”#F5F5F5″ text_color=”#333333″ radius=”3″ class=”” id=””]
Download Arduino Wheeled Robot on GitHub. Includes 3D Printed Chassis, Code, and Diagram here. (Smaller Robot Article Coming Soon) Subscribe to the Newsletter to stay updated.
[/su_note]
Part List:
| Robot Electronics | |
| Wheels (Stroller Wheels) | |
| Chassis (3D printed Files) | |
| White PLA Filament | |
| Clear PETG |
Droiid Fundamentals
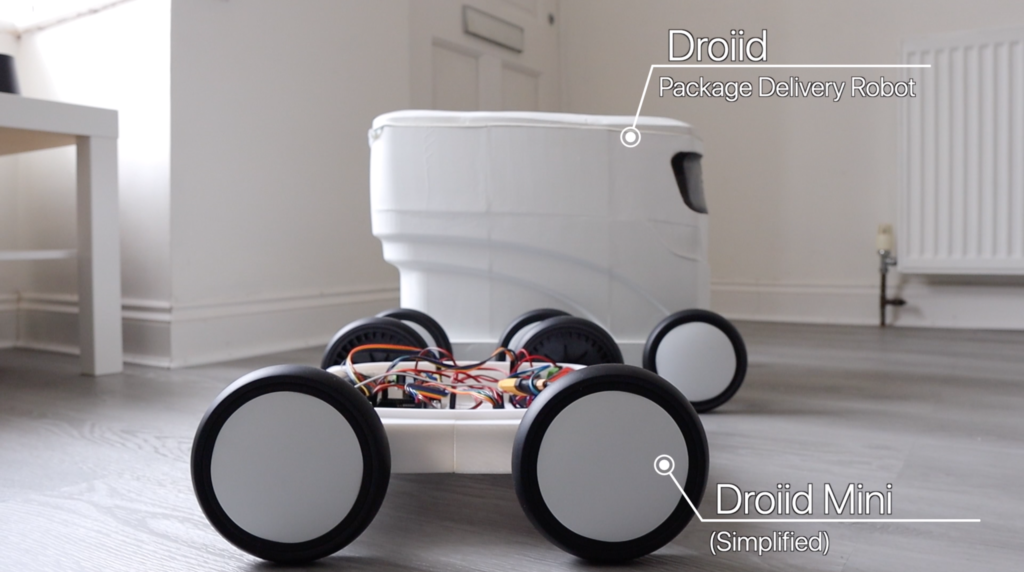
The concept of Droiid takes these fundamentals and applies them to a larger scaled Robot. As a result, all components would be required to be scaled up. I.e., instead of 4 Wheels, Droiid requires 6 Wheels. (3 on each side).
This in turn leads to additional Motor drivers, leading to a Larger battery. And since we got more power, we could take advantage of this by building a larger robot that can carry a larger Delivery payload.
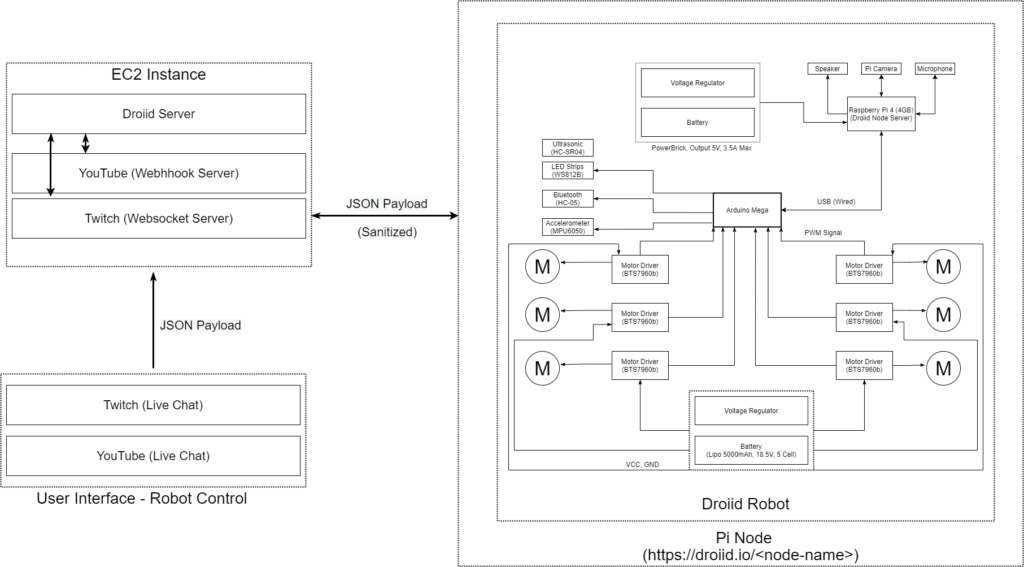
The Following Block Diagram illustrates the components associated with Droiid.
Assembly of Droiid:
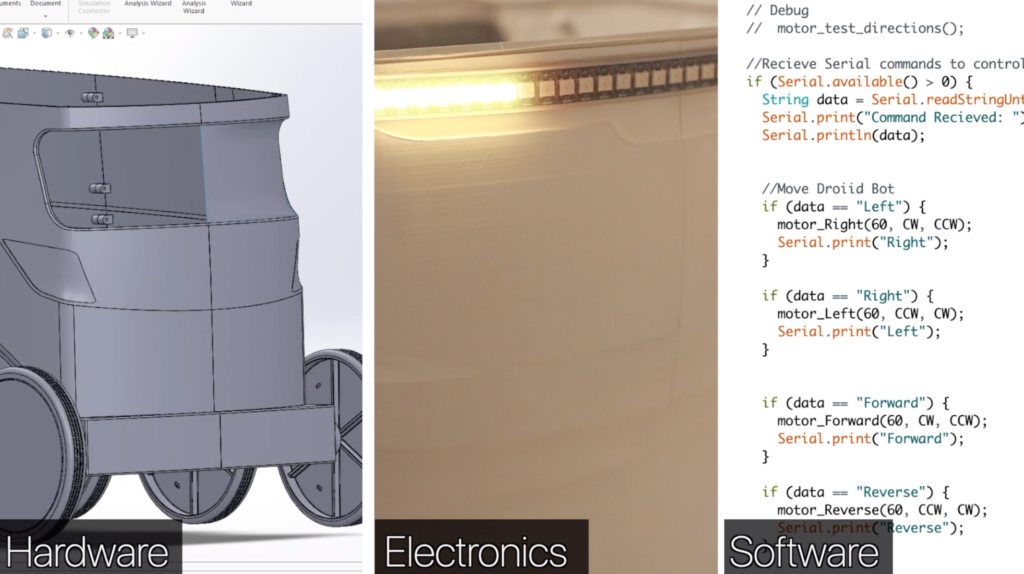
The Assembly of the Delivery Robot (Droiid) can be broken down into three main sections:
- Hardware – Including modeling, 3D Printing, and Assembly
- Electronics – Assembly of Motors, Wiring, and soldering
- Software – The E2E interaction from chat to movement of the Robot.
Hardware
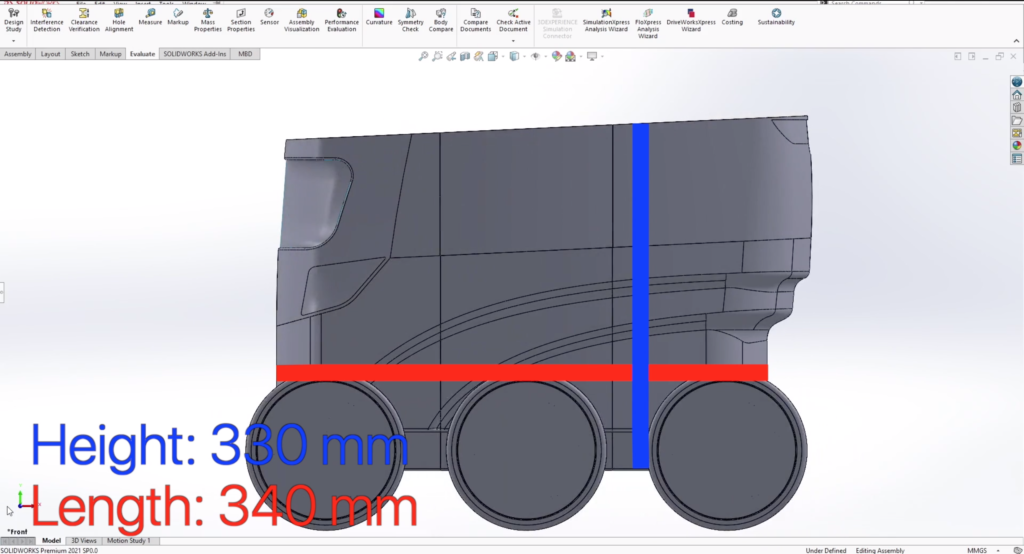
- Solid works overview
- Measurements of the Delivery Robot come at 330mm W x 380 mm H x 340mm L.
- All 3D parts were printed at a 40% infill. Ideally, for maximum strength, a higher infill would be ideal. However, at 40% infill, the 3D Print ETA was already exceeding 24 hours.
- The Design of the 3D model was broken apart into smaller sections, mainly as the Robot full dimensions were larger than the Ender 5 Pro Printing Bed.
- In order to re-assemble the Robo Chassis, the simplest solution was to add screw hole mounts to assemble to Robot using M3 x 200mm screws and nuts.
- Smooth Out -> Priming -> White Gloss
- Wood filler was used for the smoothing of the chassis parts into one main body. Whereby two coatings of a white undercoat were applied to the Chassis, followed by a high reflection gloss paint.
- The effect I was looking for was a ‘clean stormtrooper armor finish.’ (minus the Styrofoam based armor they have
Electrical – Droiid Robot Parts & Features
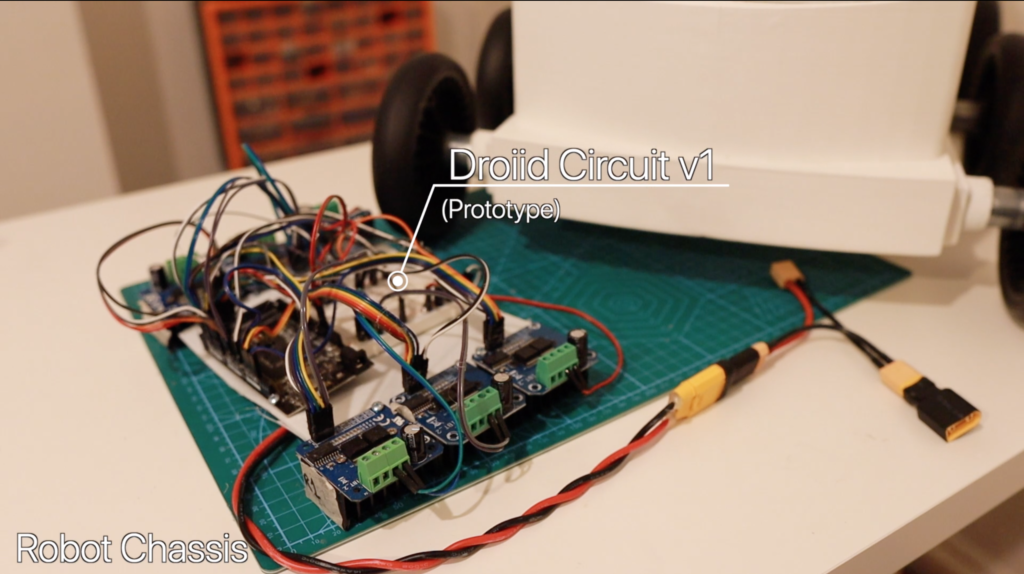
- The circuit above provides the electrical components within the Delivery Robot Robot. Droiid consists of:
- 6 Wheeled Drive Wheels which are powered by 12V high Torque DC Geared motors
- Arduino Mega (Microprocessor) – Controlling PWM to Motor Driver
- The Raspberry Pi would act as a Server Node receiving JSON data via Twitch WebSocket and communicating with the Arduino via USB connection. (Baud Rate 9600).
- Speaker and Mic – For Audio and Camera Capabilities via Twitch Streaming
- Raspberry Pi Camera Module – Video Output of the Delivery Robot’s Surroundings streaming via OBS.
- LED Strips – For Lighting and Robot Visual Feedback (Similar to LightVest)
- Electronics – Electrical Wiring, Motor Driver and Voltage Regulators
Adding Sensors- Increase the awareness of the Robot, the following sensors were added:
- Ultrasonic Sensor – Providing us spatial awareness
- Accelerometer – To help us understand the Robot Terrain, Incline if it’s toppled over or simply bell and Alarm if someone tries to steal it.
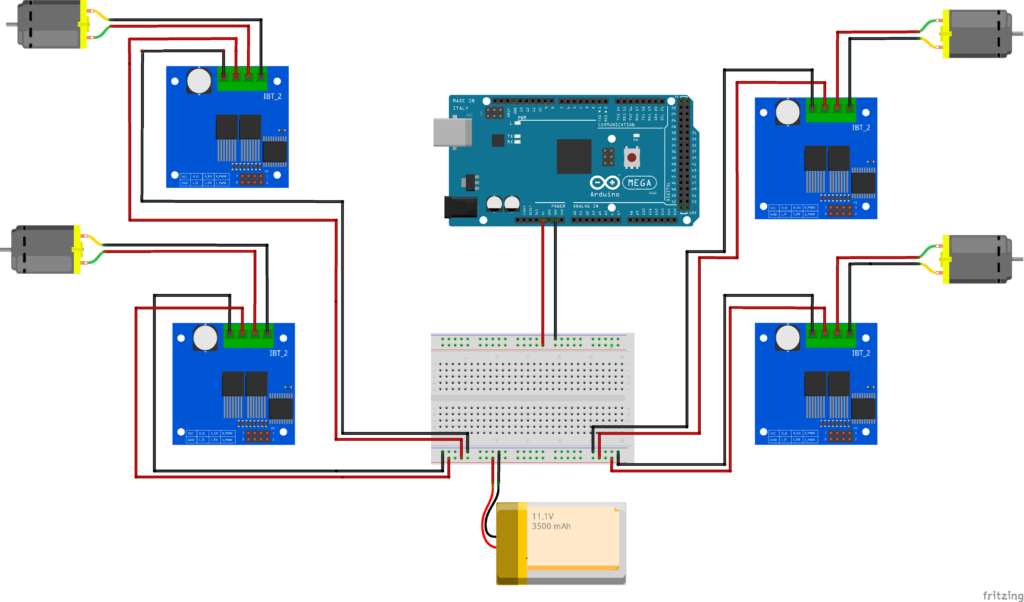
Wiring:
The circuit diagram above represents the schematics of the Robot. The schematic created in Eagle would allow us to build our own PCB board. This would help reduce the number of wires as well as providing us a cleaner look.
Software
High-Level Overview – Droiid Software Architecture
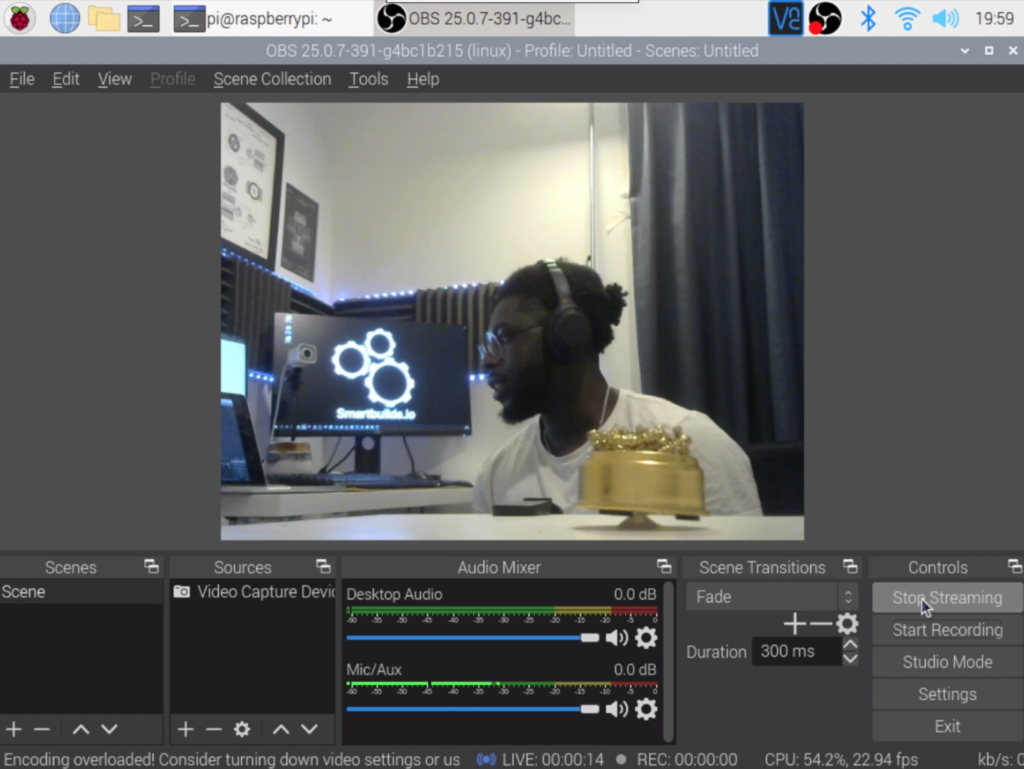
As well as being used for Camera Streaming via OBS, we’re using the Raspberry as a webserver node which would handle requests from our droiid server over HTTP secure tunneling.
Tunneling is a way to set up a private communication line between two computers over a public network such a the internet
How it works:
A user writes a command in the chat of the live stream, e.g., “say? left”
- Incoming messages from the Livestream chat are received to the Webhook Server via web sockets. The following message is then evaluated, looking for the action command being “say?” and “move?”. If TRUE, the following message is parsed as a JSON object and sent to the Droiid Server.
{"timestamp" : get_timestamp_date(time.time()), "username": twitch_username, "message": final_message[1].strip()}
- The Droiid Server routes the message to the appropriate Flask endpoint (via Flask Server), e.g., URL “/move.” The domain being https://droiid.io, port 5000.
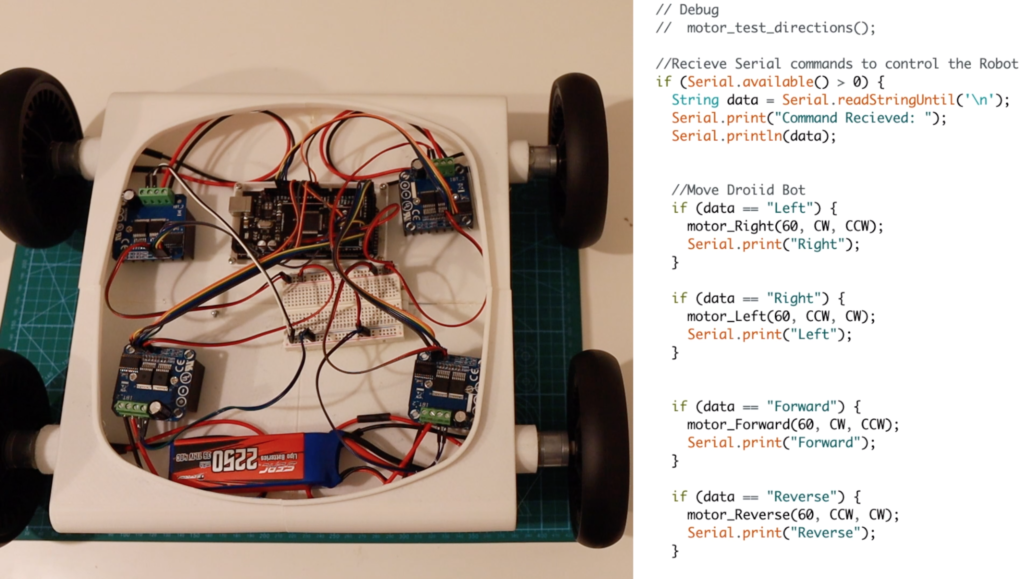
- The Raspberry Pi acting as a node server listening on the same port then processes the message and send a command to the Arduino via USB serial connection (Baud Rate 9600) to:
- to control the motors to move left, right, forward, backward, etc.
- text-to-speech.
- Note: The Software Architecture has been designed in order to be theoretically scaled to a network of many Robots, each Robot acting as a singular node connected to the Droiid Network. This makes events such as competitive Robot Racing possible. (This is something we’ll explore in the future)
Controlling Droiid- Arduino
To Recap: A user types a command within the Livestream Chat. The message is sent to a server and parsed as a JSON object, finally sent to the Arduino Web server. The Web server sends a command via USB to the Arduino.
But what is the communication between the Raspberry Pi and Arduino?
The Arduino has established a connection with the Arduino and is always listening on Baud Rate (9600).
When a user types “move? Left” the Raspberry Pi sends the command “Left” to the Arduino.
# Send data to the Arduino
@app.route('/movement', methods=['POST'])
def move():
    ser.write(str("Right\n").encode('utf-8'))
if __name__ == '__main__':
    ser = serial.Serial('/dev/ttyACM0', 9600, timeout=1)
    ser.flush()
    app.run()
The Arduino listening form data on Baud Rate 9600 receives the following bytes as “Left.”
 if (Serial.available() > 0) {
    String data = Serial.readStringUntil('\n');
    Serial.print("Command Recieved: ");
    Serial.println(data);
//Move Droiid Bot
    if (data == "Left") {
      motor_Right(60, CW);
      Serial.print("Right");
    }
The Right Motor would move at a PWM of 60%, making the whole Robot move left for a specific period.
We can add a delay to keep the Motor on for a specific period of time. And this can be a way of increasing the sensitivity of how far the Robot should move based on every command a user writes.
If you want to fetch live stream data from either Twitch or YouTube, I’ve put together two Python applications (both less than 50 lines of code).
This can be used for many different use cases e.g., make the text-to-speech the output of the Livestream or read a super-chat:
Stream Twitch Livestream Chat Data with Python Websockets: https://github.com/EbenKouao/twitch-chat-websocket-python
Fetch YouTube Livestream Chat: https://github.com/EbenKouao/youtube-live-chat-fetch-python
Performance
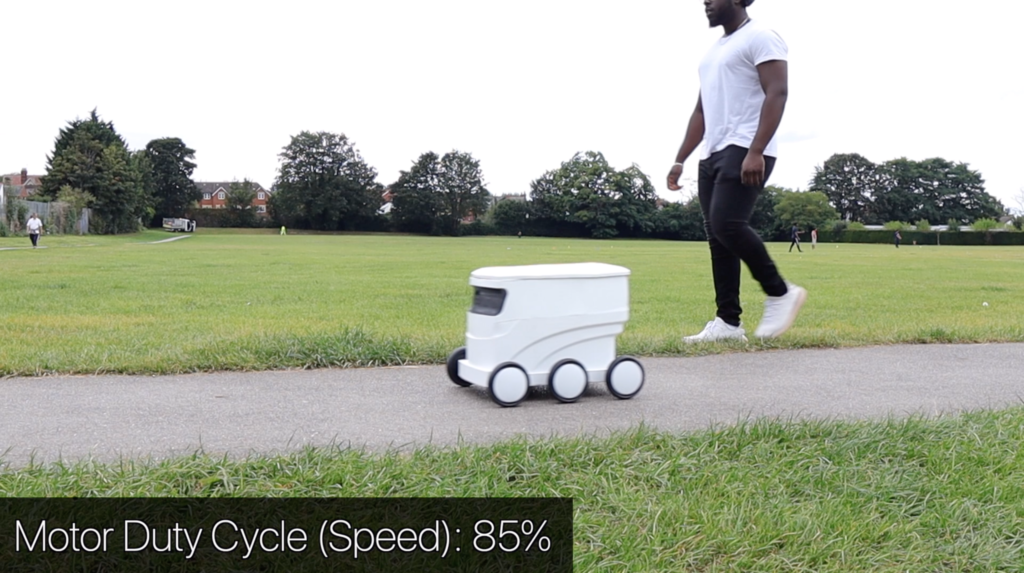
Early testing of the Delivery Robot focused on Speed. The Robot was able to travel at a walking distance (at Motor 35% Duty Cycle) and a good jogging pace (at 85% PWM Duty Cycle).
However, for this version, In order to maintain good control of the robot. Droiid speed would be heavily capped to a speed that is slightly slower than walking speed.
Droiid V1 Limitations
This is v1.0 of Droiid, and as a result, there are some limitations that can be improved:
- Low Latency – Streaming OBS via the Raspberry Pi (via Twitch) leads to a dropped frames and stream quality as low as 10 FPS, which isn’t ideal for real-time communication leading to a poor experience.
- Small Wheel Ratio – The Wheels are relatively small, which makes it difficult to climb over pavement curbs.
- Theft – There isn’t anything stopping someone from just taking the Robot. However, the possible use of an accelerometer to trigger an alarm based on the Robot being snatched can be a deterrent.
These questions would be aimed to be solved for Droiid. Version 2.0
Droiid Git Hub Repo:
Outro

Next Steps
This wraps up all the updates for the 6 Wheeled Delivery Robot (Droiid V1.0). There are many improvements that we can make to make Droiid more responsive and aware of its surroundings. As well as creating new events e.g IRL Immersive Robot Circuit Challenges – where you can control the Robot.
The fundamentals you’ve learned here open up new avenues for innovation, from integrating more sensors for improved awareness to expanding Droiid’s capabilities in future versions.
These improvements would be considered for v2.
[su_note note_color=”#F5F5F5″ text_color=”#333333″ radius=”3″ class=”” id=””]
All parts, schematics, and 3D printed files for Mini Droiid can be found here.
If you would like to control droiid via Livestream, Join the stream on Twitch or YouTube. Ask questions, contribute, and enjoy the show.
Lastly, If you would like to support this project, consider supporting my Patreon page.
Alternatively:
[/su_note]