The idea of smart mirrors might sound like something straight out of science fiction—a “magic mirror” that displays personalized information, controls smart home devices, and recognizes your face.
But what if I told you that you can build one yourself, and it could do all of that and more?

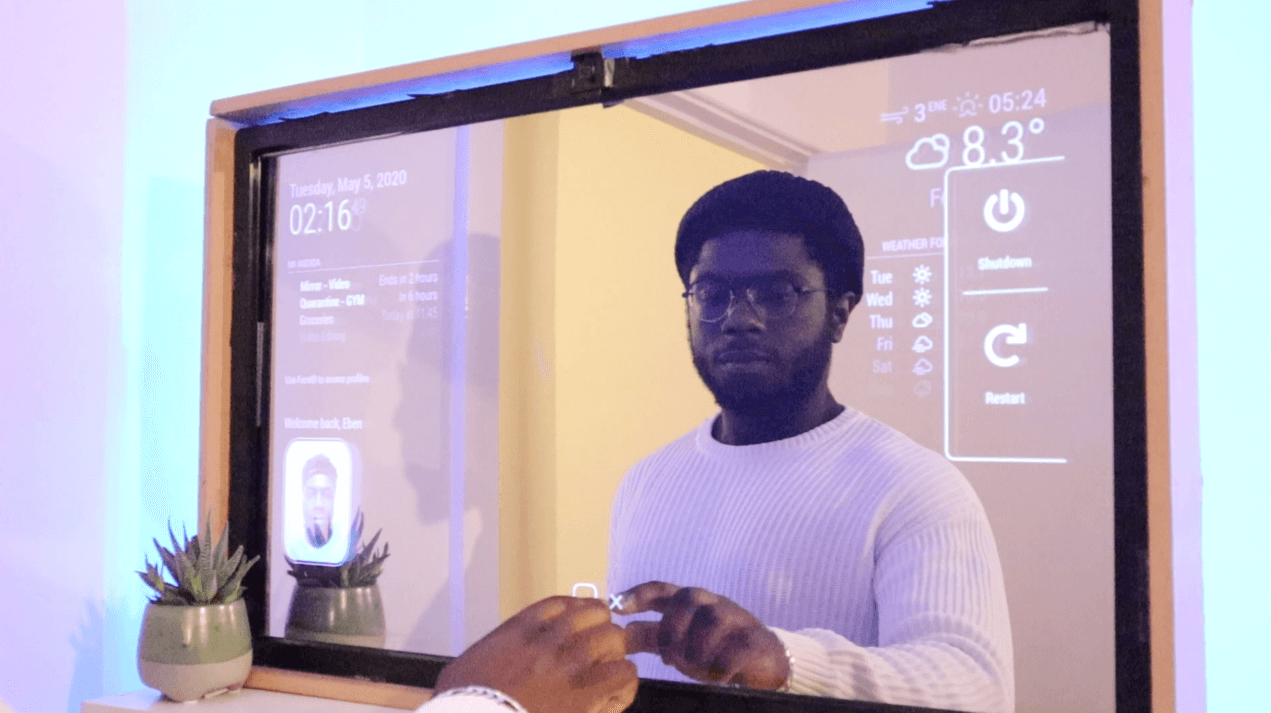
Imagine a Smart mirror that could work as a central touchscreen interface for your home to control smart home appliances, provide the latest news, stocks, and features Face recognition.
Well, this is possible! In this article, you’re going to find out how.
This project is all about building a Smart Mirror AI (SMAI) powered by the MagicMirror platform, complete with touchscreen capabilities and face recognition. By the end, you’ll have a fully functional, personalized smart mirror that could transform the way you interact with your smart home.
Goal: By the end of this article, you’ll be able to build a Touchscreen Smart Mirror with a face recognition module to interact with.
[su_note note_color=”#F5F5F5″ text_color=”#333333″ radius=”3″ class=”” id=””] Download Demo: Download the Face Detection Raspbian Image on smartbuilds.io. Simply stand in front of your Camera module and trigger events.[/su_note]
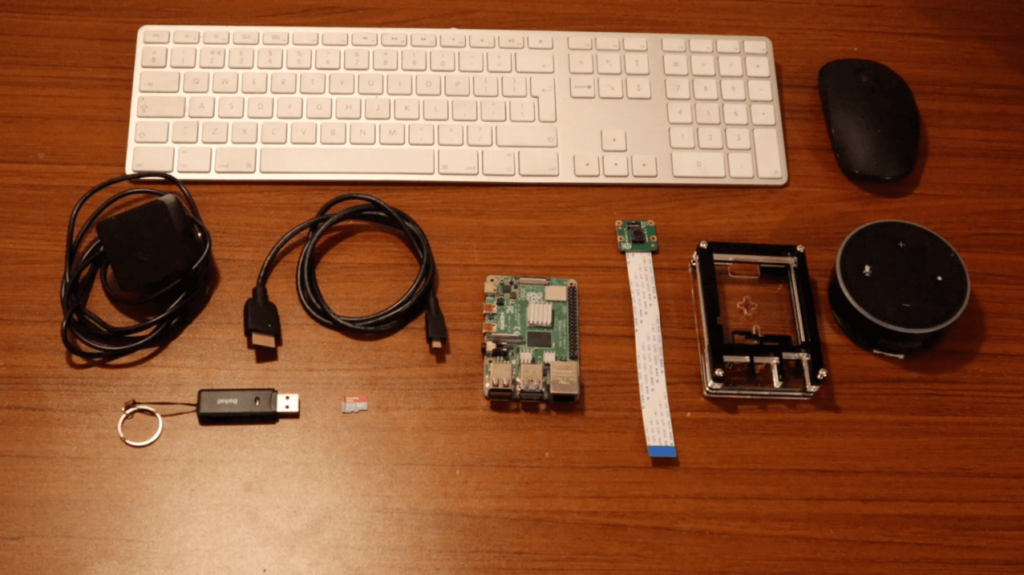
Parts List – What you’ll need
Pre-requisite: Raspberry Pi 4 (RAM 2GB+) Recommended:
Main Parts (Hardware Components):
| Amazon | Ebay |
||
Raspberry Pi 4 Model B (2GB +) | |||
Power Supply | |||
Two-Way Mirror | |||
Raspberry Pi Camera | |||
Micro SD | |||
Micro HDMI Cable | |||
Monitor | |||
IR Frame |
Software and Platforms
- MagicMirror
- Raspberry Pi Raspbian Buster
- Alexa (Online Services)
Hardware Materials:
- Fibreboard Wood
- Hacksaw
Cost: The total cost would vary based on your own specification preference. Fortunately, Smart Mirror could be scaled down, and customized to your liking from small 7″ Touchscreen displays to 55″ large IR Frames. In this example, we’ll use a 32” IR Frame.
Hardware Assembly
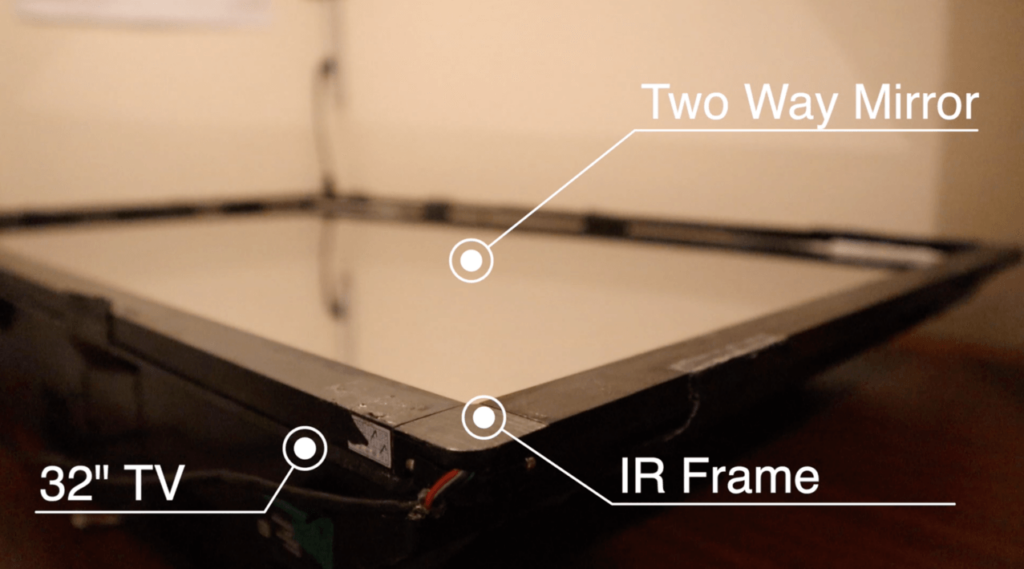
The custom-cut two way-mirror was placed directly on top of the 32″ Monitor. In addition, the IR frame was used in order to add a touch interaction with the smart mirror. The IR frame uses a USB 3.0 peripheral to connect to the Raspberry Pi. Some IR frames also support multi-touch gestures on different Operating Systems e.g. Windows and Mac, this makes it useful for future projects.
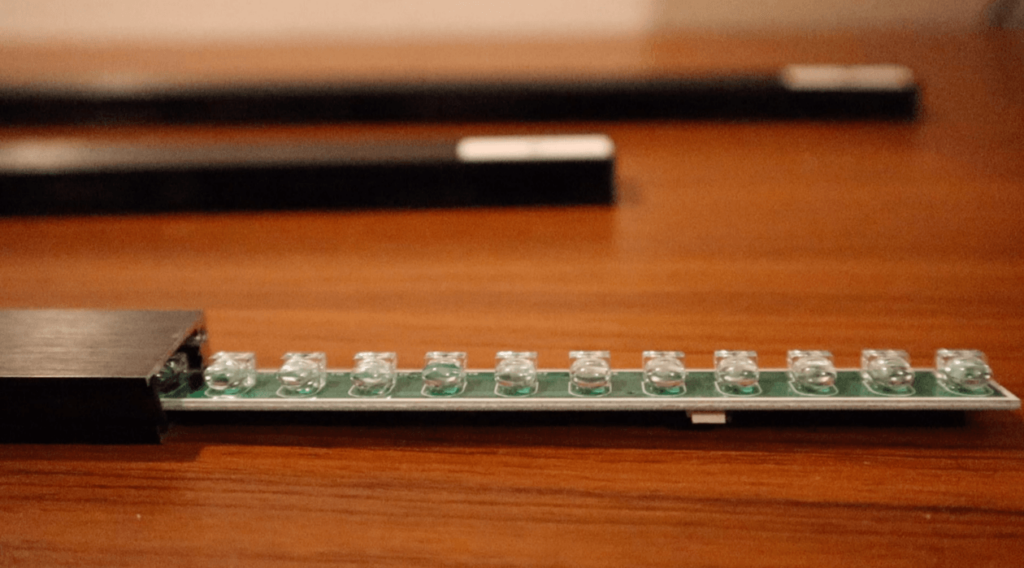
How IR Frame works
IR frames are based on light-beam interruption. Typically IR frames have LEDs on one side of the frame and Light detectors on the opposite side. Similar to an optical mouse USB peripheral, based on where you touch the frame a beam interruption occurs and the IR sensor is able to co-ordinate where you’ve touched. This information is relayed back to your Raspberry Pi corresponding to your display.
Building Mirror Frame And Assembly of parts
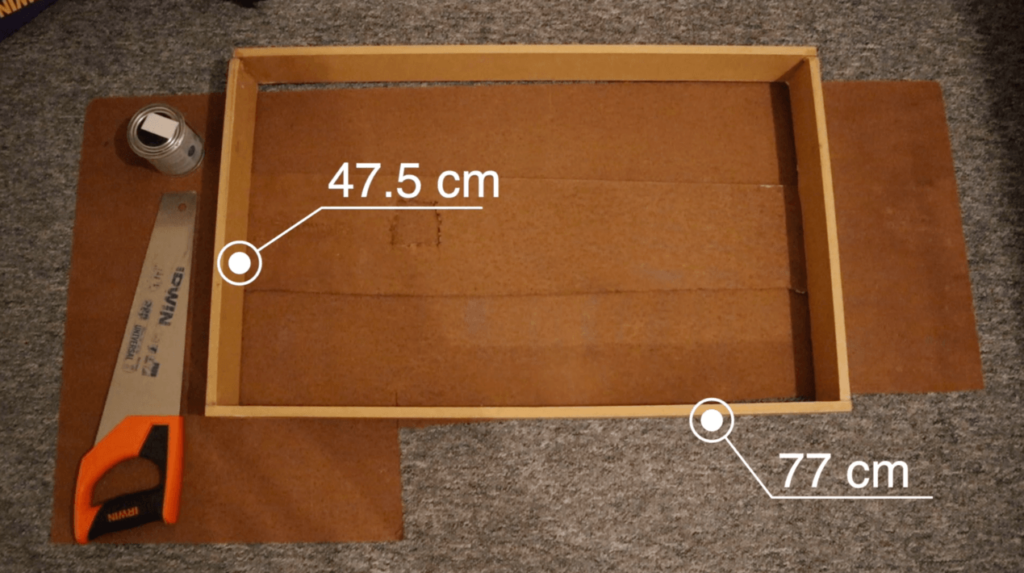
A wooden frame was built In order to encase the 32 inch Monitor. (However, your build can be left to your creativity).
This was assembled using 1×4 Fiberwood from your local DIY store, and a hacksaw to cut the dimensions. Strong PVA (Gorilla) glue and nails were used to re-enforce the frame. The final mirror dimensions were W 47.6cm x L 77cm x H 7cm.
A monitor strap/ back support was added to secure the support of the Frame. An opening on the strap was made to allow space for HDMI ports on the monitor for the Raspberry Pi display input. An Interior varnish coat was added to the frame to give it a nice glossy finish.
LED Strips:
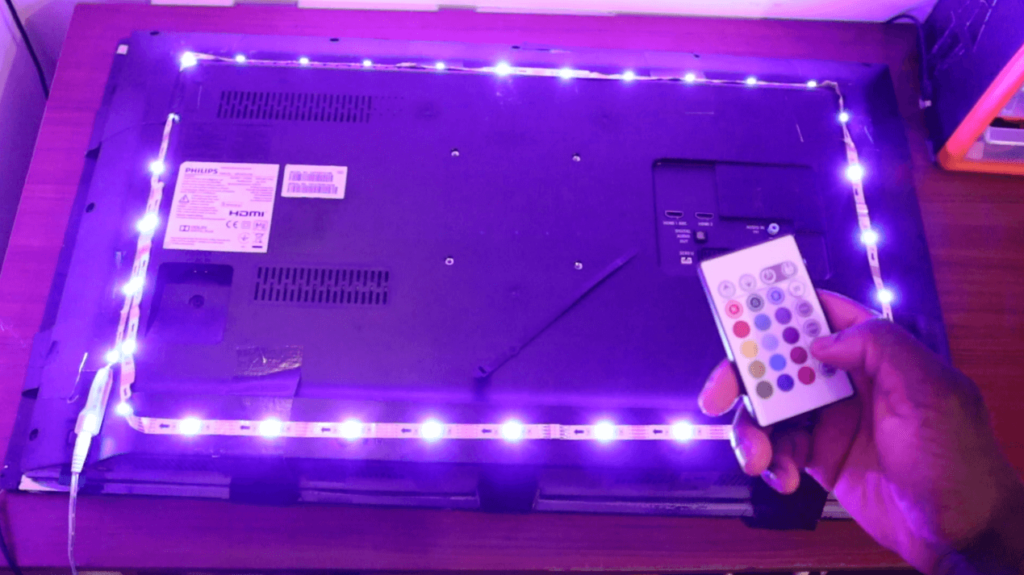
LED strips were added to give the mirror a nice ambient glow. The strips included an adhesive coat to the back which allowed us to peel and wrap the strips around the Monitor.
The LED strips also includes a remote for changing LED colours.
Looking from hindsight – We recommend a monitor with HDMI ports on the side of the Monitor
Installing Raspbian Buster
The Raspbian OS was flashed onto the 32 GB Micro SD Card. You could find more information on how to install the latest Raspbian OS on the Raspberry Pi site. The YouTube tutorial equivalent also outlines this.
- Download and install The latest Raspbian OS which can be found on Raspberry Pi
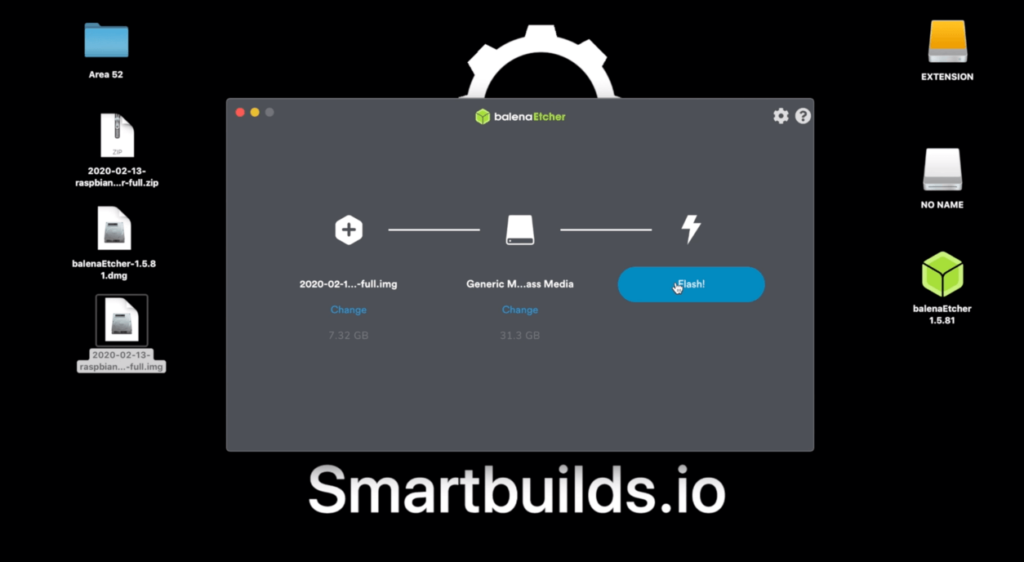
- Download Etcher and install the application on your computer. (Compatible with Mac OS X and Windows)
- Plug your Micro SD card Adapter with your SD card to the computer.
- Open Balena Etcher and select extracted the image you’ve downloaded.
- Ensuring the correct disk has been selected click “Flash!” to begin writing the image to your SD Card. Note: This process could take 10-15 minutes
- Remove SD Card and plug in Pi. Whereby you could access Pi via VNC or Mouse and Keyboard
Installing Magic Mirror
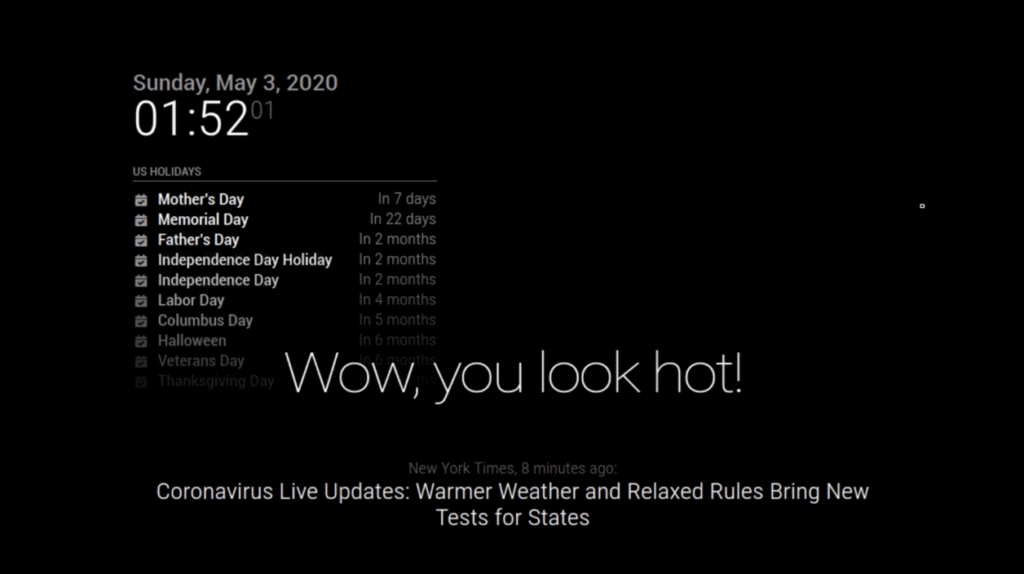
MagicMirror is an open-source modular smart mirror platform developed by MichMich. It’s has a great community and support which makes this a solid project.
Upon boot-up of the Raspberry Pi, complete the remaining setup, and ensure you’re connected to the internet via LAN/Wi-Fi.
Head off to Magic Mirror for the full Installation & Usage Guide. For simplicity the main snippet has been quoted below:
Run the following commands in terminal
Note: The official support way of installation has been updated from single line command to manual installation. Fortunately, this is just as straightforward.
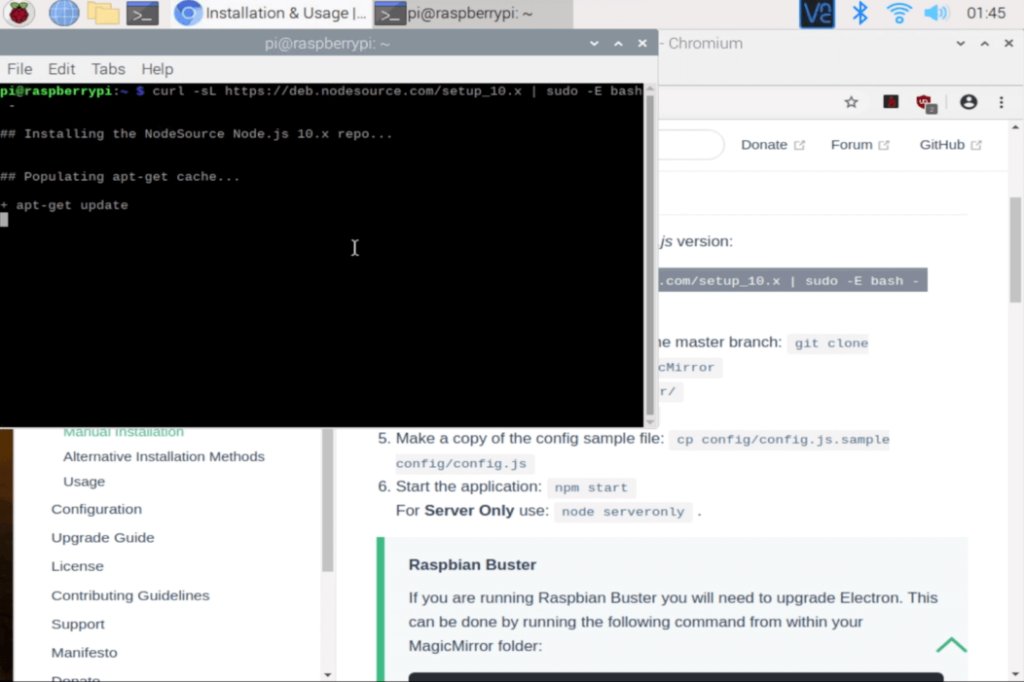
Download and install the latest Node.js version:
curl -sL https://deb.nodesource.com/setup_10.x | sudo -E bash -
sudo apt install -y nodejs
Clone the repository and check out the master branch: git clone https://github.com/MichMich/MagicMirror
Enter the repository: cd MagicMirror/
Install the application: npm install
Make a copy of the config sample file: cp config/config.js.sample config/config.js
Start the application (Recommended for this setup): npm run start
For Server Only use:npm run server
.
Note: You could decrease the MagicMirror size of the font with CTRL + –
Auto Starting Magic Mirror – Installing PM2
Note: If you would like to have your MagicMirror working from start-up, we recommend installing PM2 a production process manager. You could do this by following the steps outlined on Auto Starting Magic Mirror.
Adding additional Modules
Adding modules is a great way of customizing your mirror in a unique way. With over 400 modules ranging from Spotify, News to Face Detection customizing your mirror is much more interesting. Visit MagicMirror Third-Party Module
Installing Smart Touch – Touchscreen interactive
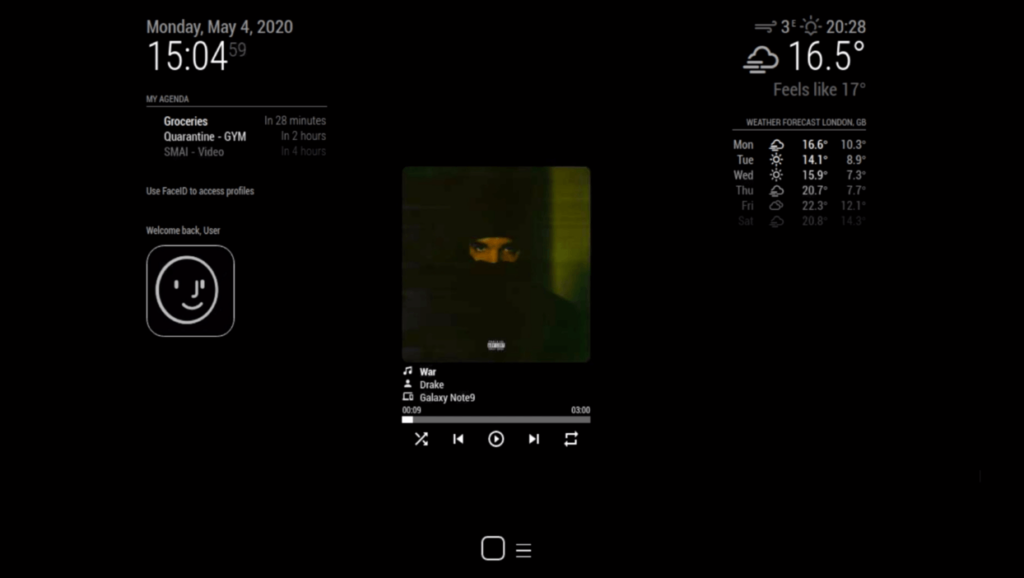
In this example, we’ll be adding a module we developed: MMM-SmartTouch
This module allows you to hide all your mirror modules transforming your mirror into a normal “Basic Mirror”.
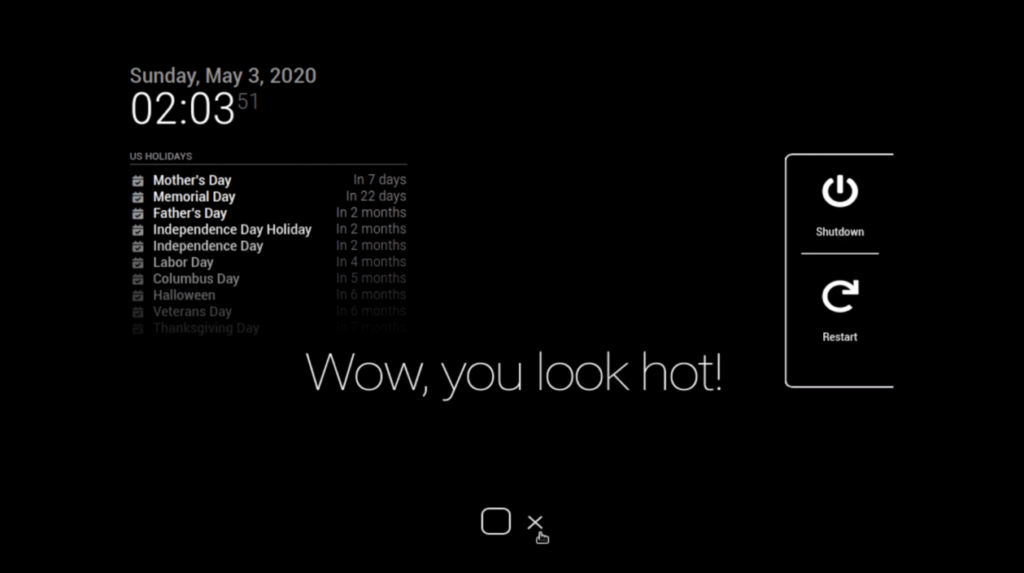
An additional side menu has been developed to safely Power Off / Reboot your pi without the need to pull your power cable. This can prevent SD card corruptions over long term use. If you like this, why not contribute to more features in the MMM-Smart Touch GitHub Repo.
Step 1 – Install the module
Open up the terminal on your Raspberry Pi and follow the below commands:
   cd ~/MagicMirror/modules
   git clone https://github.com/EbenKouao/MMM-SmartTouch.git
   cd MMM-SmartTouch
   npm install
Explanation: The above code clones the SmartTouch module to your git repo whereby npm install in the SmartTouch directory downloads the packages and dependencies.
Step 2 – Add files to the Config.js
Copy the following command to config.js
{
    module: 'MMM-SmartTouch',
    position: 'bottom_center',    // This can be any of the regions.(bottom-center Recommended)
    config: {
        // The config property is optional.
    	}
}
Note: Bottom Center is the preferred default of this module, for an aesthetic module.
Installing Face Recognition Module – Personalising your Mirror
Installing Face Detection Module
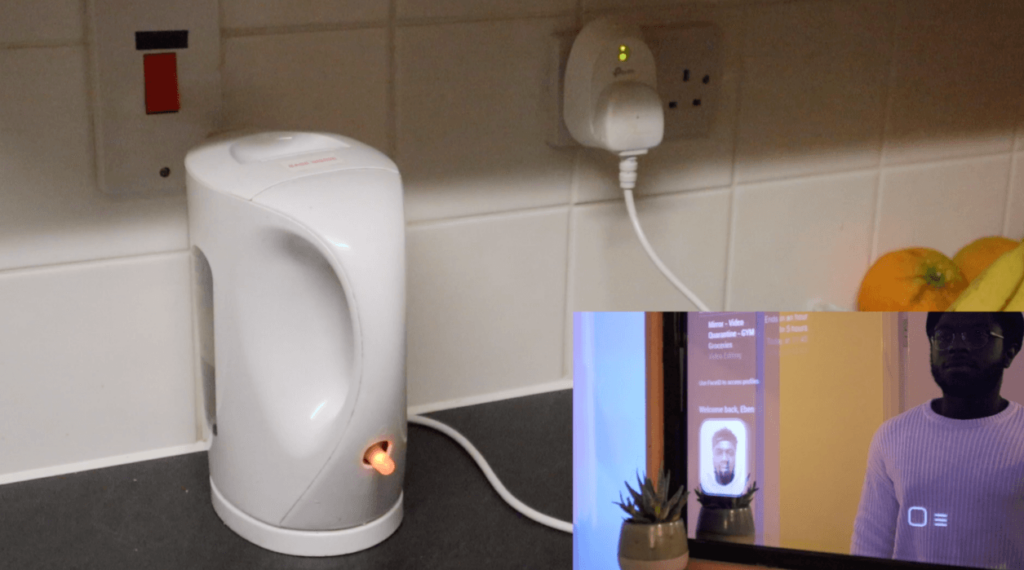
The Face detection module is a nice feature to complement the touch interaction. The use cases for this are endless spanning to home automation. In the below example the Face Detection module was used to trigger smart plugs to turn on the Kettle. You can manually install the face recognition libraries here.
Note: You can find the full face detection demo Raspberry Pi build on smartbuilds.io
You can find Face Detection Module: MMM-Face-Recognition-SMAI
The OpenCV face detection module is lightweight and responsive, which makes it ideal for the mirror to trigger other processes. Due to the scope, we’ll go into detail in future articles on how to control a home appliance. Specifically the TP-Link Smart Plug.
MMM-Face-recognition-SMAI module require a few dependencies before operating.
- OpenCV Face Recognition by Ageitgey.
- Raspberry Pi Camera Module
- Ensure that the Camera has been enabled via sudo raspi-config
- Raspberry Pi 4 2GB+ (Recommended)
- You could possibly use the Pi 3B+ however you may receive a slower detection time
Dlib and face_recognition libraries would be required to be installed. We’ve linked to our post on How to install a face detection library on Raspberry Pi 4.
Step 1 – Install the module
In your MagicMirror directory:
   git clone https://github.com/EbenKouao/MMM-Face-Recognition-SMAI.git
   cd MMM-face-rec
   npm install
Step 2 – Add files to the Config.js
Here is an example for an entry in config.js
{
  module: "MMM-Face-Recognition-SMAI",
  position: "top_right",
  config: {
    //prompt: "Put in your own text"
  }
}
The face detection interacts with the Python script to recognise you and display your name. Since Python runs independently of the MagicMirror with a bit of programming you could program the face detection to trigger an event externally e.g. Turn on Smart lights.
How it works the face detection module works:
Here are the 3 main files you would need to understand:
1) SMAI-face-dection.py – OpenCV face detection Python script that constantly tries to identify persons based on the images already provided. (You’ll only need to program this if you wish to develop use cases beyond this project scope).
2) MMM-Face-Recognition-SMAI.js – Displays the profile image detected as well as the name
3) Sample.txt – Works as a temporary buffer. Stores the name of the identified person from SMAI-face-detection.py as a temporary variable and read to the Face-recognition-module.
[su_note note_color=”#F5F5F5″ text_color=”#333333″ radius=”3″ class=”” id=””]Note: If you’re still unsure, we recommend downloading the already pre-packaged face detection to get an understanding of how it works.[/su_note]
Changing your profile image:
By default, the Profile Image is Tony Stark. However this could be changed to yours using the steps below:
2) Changing your profile:
- The beta version of this module is restricted to only 1 user.
Go into the directory (preferably via GUI)
cd /home/pi/MagicMirror/modules/MMM-Face-Recognition-SMAI/public
Replace the two .png images with your desired face while keeping the same naming format.
Using the below naming convention.
- face.png
-id.png e.g Tony-id.png – The is what would be displayed on the display, being Tony.
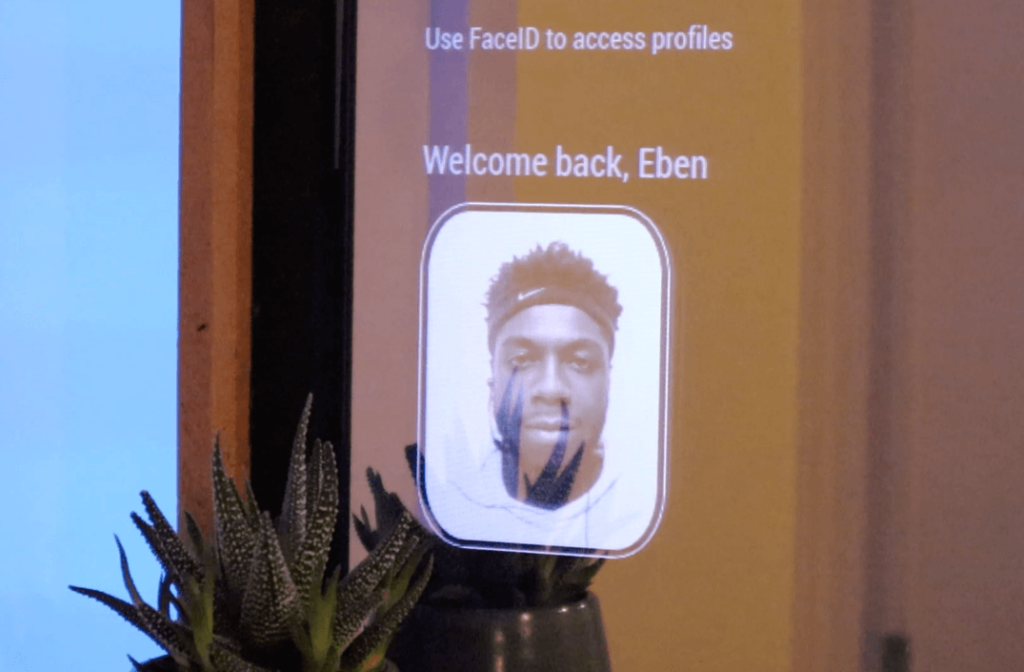
Watch your faceID pop up on display every-time you’re detected. Using this you could build your own applications.
View Full Smart Mirror Touchscreen (With FaceID) using Raspberry Pi 4 Tutorial:
Next Steps: What will you make?
That’s not the end of this project. We’ve now been able to build the foundations of a smart mirror. Given the additional feature of face recognition and a new touchscreen interaction, the applications are endless:
- Home automation
- Multiple Profiles
- Extension on UI Interaction
Conclusion
Looks like we’ve reached the end. That’s all folks!
And there you have it! You’re now equipped to build your very own touchscreen smart mirror, complete with face recognition and endless possibilities for customization. Whether you want to use it for home automation, multiple user profiles, or new touchscreen interactions, the potential is limitless.
But don’t stop here; it would be great to see what you can develop further with your own mirror. If you have any questions, leave a comment below.
[su_note note_color=”#F5F5F5″ text_color=”#333333″ radius=”3″ class=”” id=””]
If you would like to support this project, consider supporting my Patreon page.
Alternatively:
[/su_note]
Hi Eben. Can you say me which type of mirror you have used? Is there also any other varieties of mirror that I can use like glass, etc. Can you say me how can I play music on Spotify by touch interaction without using Alexa. Is there any icon on smart mirror on which I can press and spotify app will open and I can search for any music.
Hi Biswajeet,
Thanks for getting in contact.
I used a acrylic two-way mirror. You can use glass, I found acrylic works just as well and is typically cheaper. For point 2, not at the moment. So far it uses normal controls such as, pause, shuffle, next, rewind.
This module is a open source module: https://github.com/bugsounet/MMM-Spotify
You can build on top of this using Spotify API’s.
Hope this helps,
A very late reply.
P.S: I’ve got a new release on a DIY electric skateboard (faster than a boosted board) coming soon.
Eben.
Hi Eben,
Great video.
Do you think I could I do this without the touch screen element? If so how would you navigate the features of the mirror. The touch frame is a bit expensive for me at the moment.
Best wishes,
Jack
Hi Jack,
Sure, can do without the IR frame. However, if you would like a cheaper alternative have a look at IR leds, you can make this a gesture control instead. You can try out the Raspbain OS beta first if you like.
A late reply… let me know if you managed to build one.
Thanks,
Eben.
Hi,
Thanks for this brilliant tutorial! I’m new to electronics and just starting out and really excited that this is my first project!! I’ve ordered all the parts and have installed the software. Can I ask if it is possible to use an echo dot or is there an option to use aws so alexa is on the Pi? If you could cover either of these it would be great. Once again thanks so much for all your time and trouble with this awesome project!
Regards Simon
Hi Simon,
Late reply – would be more active on the website.
That’s great, hope you manage to start on the project!
Yes, you can take two options, you can use an echo dot or you can install Alexa on the Pi. Known as Alexa Pi.
There are some good installation / tutorials on this:
https://github.com/alexa-pi/AlexaPi
All the best,
Eben.
Hi, Good evening. Myself gowtham Thangavel from India. I accidentally saw your video and it’s amazing. I have subscribed your channel too. I have a question. How this works without connecting the monitor to CPU. please provide me complete step by step process. I would like to try myself. Keep rocking??❤️
Hi Gowtham,
Greetings from the UK.
Unfortunaltey, you require a ‘Computer’ to run the MagicMirror Platform. In this case being the Raspberry Pi, but can theoretically run on a Laptop. However, that may be a bit of an overkill!
Let me know how your build goes.
Regards,
Eben.
Very freaking awesome man! Will be doing this soon. Much thanks for the step-by-step!
Hi Blake,
Thanks! Got a DIY Skateboard tutorial coming soon. It’s gonna be a big one, stay tuned 🙂
Regards,
Eben.
Hi. Amazing stuff. Just a simple question to start off. How do you layer the IR frame, two way mirror and the TV. I know you showed a diagram but I am still a little confused. In others words, does the IR frame go over the two way mirror which is over the TV? Or is the two mirror over the IR frame which is over the TV?
Hi Raul,
Definetly a late reply, (from bottom to top) The layout is Monitor -> IR Frame -> Monitor.
Let me know how if you manged to start the build.
Best,
Eben.
Great job Eben, the best smart mirror I have ever seen!
Congrat and follow further!
Thanks Bob, got a DIY Electric Skateboard coming soon. – Faster than a boosted board, for a fraction of the cost.
Stay tuned 😉
Eben.
Hi, i just wanted to ask how i can change the weather or use my own calendar, it seems everytime i try to change the configuration and load up magic mirror it says theres no config files. What can i study to resolve this issue?
Does the Face Rec also works with a Standard USB-Webcam?
Hi Ben,
Yep, however you’ll need to change the code to specify you’re using a USB:
The Face recognition github already has an example:
facerec_from_webcam_faster.py
Best of luck,
Eben.
Hi Eben, you said that you custom cut your 2 way acrylic mirror. Do you think you could provide us with the dimensions? I wanted to make an exact replica to yours, with a 32 inch monitor and the same mirror frame dimensions. Thanks for the great video.
Hi Jon,
The exact dimensions of the two-way acrylic magic were 30 cm x 72 cm (h x W). I managed to find one that was a perfect fit. You may need to search around for a fit.
Good luck.
Hi Eben.
Amazing stuff. quick question on how to get ride so messages on top screen ” Update available for MMM-Face-Recognition-SMAI module ….. MagicMirror2 update available ….
I run both update/upgrade and run the cd ~\MagicMirror git pull …
thanks,
Pete
Hi Pete,
The update notification should disappear once you git pull in the MMM-Face-Recognition-SMAI folder.
You should be in /MMM-Face-Recognition-SMAI folder and git pull. This should update the repo and the notification should go.
Cheers,
Eben
Hi Eben,
It did made the MMM-Face-Recognition-SMAI side disappear but on the MagicMirror update available still there with message “The current installation 164 commits behind on the master branch.
I try to git pull under the MagicMIrror directory but error message “Your local changes to the following files would be overwritten by merge: package-lock.json .. Please commit your changes or stash them before you merge.
Aborting ”
Thanks,
Pete
Hi Pete,
It looks like there may be some local changes to you file itself and it’s gits way of protecting your changes:
Hopefully, this can help:
https://stackoverflow.com/questions/15745045/how-do-i-resolve-git-saying-commit-your-changes-or-stash-them-before-you-can-me
Good luck,
Eben.
I am really impressed with your writing talents and also with the format to your blog. Is this a paid theme or did you customize it yourself? Either way keep up the nice high quality writing, it’s uncommon to peer a nice blog like this one today.
Cheers, a WordPress based site 🙂
I am extremely inspired together with your writing talents as smartly as with the format for your weblog. Is this a paid subject matter or did you customize it yourself? Either way stay up the excellent quality writing, it is uncommon to see a great weblog like this one today.
Hello,
I’m just wondering how Facial Recognition would work with multiple people using the mirror. In your project, you have a single face in “face.png”. Will this code still run if I have a single picture of myself and someone else, and then have separate “-id.png” files for the both of us? Just trying to understand if I have to create an array of faces or if the code will just work as-is
Hi Michael,
Good question,
As for now, the module recognizes one face only. However, the latest Smart CCTV repo allows for multiple profiles.
If you want multiple faces on the smart mirror it would require a bit of coding/merging via Python to get this working.
This would allow you to store all relevant profiles in a folder and let the camera recognise who it is and display the image.
Have a look/test the Smart CCTV repo:
https://github.com/EbenKouao/SmartCCTV-Camera
Camera.py is loads all relevant images from the profiles folder.
If you do look into making a multiple profile feature, feel free to commit to the branch.
Thanks,
Eben.
I appreciate the reply, thanks Eben!
Really cool!
How does the Spotify module work? Will it connect to any Bluetooth speaker?
The Spotify module works more of as an API showing the current playback directly from your account:
https://github.com/bugsounet/MMM-Spotify
This build doesn’t play Spotify natively from the Pi. But through Alexa. However, you can have a look at installing Alexa into the Pi: https://github.com/alexa-pi/AlexaPi.
Best,
Eben
Hello,
Sorry if my english is bad I’m french. I have some questions about the magic mirror.
I have a problem to solve, the modules are in small.
I have added modules and since then they have become small and doesn’t adapt to the change in resolution of the raspberry.
I can send pictures and config.js if you want.
Thanks in advance.
Hi Jordan,
It may be because of your monitor resolution.
These two things may help:
– Change resolution in sudo raspi-config
– Press CTRL and + to adjust the Magic Mirror size.
Good luck.
Thank you for your response.
I’ve already done both and nothing needs to change.
I put different resolutions and the CTL + -/+ doesn’t even work.
If you have other ideas.
Hi Jordan,
J’aimerais réaliser ce schéma, tu peux me guider sur le matériel qu’il faut exactement?
Merci bien
Bonjour Derlich,
You can find all the details/ parts in the part list here: https://smartbuilds.io/smart-mirror-touchscreen-raspberry-pi/
Hey does raspberry pi 3b + work for this project as well?
It should do. Try downloading the Smart Mirror Demo image and testing it out. Let me how it goes.
Eben.
Hello Eben! This is such an Amazing Build. I actually posted this question on the youtube video, but I was wondering if you knew how we were to customize the led strip to change color based on the person doing it via the Face ID component to the mirror. Thank you!
Hi Eshwar,
Sure, as an easier implementation I would recommend getting the led ws8212b which is programmable with the Pi/Arduino. That way you can choose pretty much any RGB Hue.
Good luck!
Hello Eben,
I love this build, I think I want to make it myself. I had one question about the led strips. How do you connect them to the face id software so that you can customize the colors depending on the “profile”? You mentioned it in the video but I don’t see where it is connected to the raspberry pi itself. Can you tell me a bit more about this?
Sure, this was a custom build that included linking the face recognition module to my smart plug. this was programmed that each time a user came. A new call would be made to my smart plug to trigger it on/off or even change colors.
I would probably cover this at another time.
Is there something that needs to be changed in the config to use the touchscreen in portrait mode? In landscape mode it works great.
Great to hear that it work well!
There is a way on the Pi, however, the IR frame orientation to vertical may depend on the manufacturer. Do check the manufacturer’s website to see if vertical orientation is possible.
I purchased the acrylic mirror to build my own (I made my own software). It arrived shattered. Just spend the extra money and get a real 2 way mirror.
🙁 Wow, do get in contact with the manufacturer to sort that out.
It’s been a while since you commented, looking forward to an update on the project. Thanks.
Hello,
This is my first project and I have this question for you 🙂 I think the sound of your voice is capte by your Alexa device.
I don’t personally have an Alexa but if I understood well, i could use the open CV and integrate it to my raspberry pi. Than, I could use it like a real Alexa device (whitout buying the device), is that right?
If this is right, I’ll need something to capte the sound of my voice and I don’t think the TV can capt the sound. I thought to buy this https://www.amazon.com/SeeedStudio-ReSpeaker-4-Mic-Linear-Raspberry/dp/B07PVXZ2LN so I’ll be able to speak like a real Alexa product. What do you think about that?
Thanks you so much, I really like what you do!
Oh and forgot to ask and maybe suggest for others an alternative solution for the touch screen. I was thinking of installing https://www.seeedstudio.com/3D-Gesture-Tracking-Shield-for-Raspberry-Pi-MGC3130-p-4073.html to simulate gesture control. It’s cheaper but I don’t know if it’s a good idea yet. You might also like to give your opinion on this device :)?
Again, thank you very much!
Hi Jean-Christophe!, haven’t seen this before looks great! (may even use it for a future project)
You could use this so far as this could interface as a mouse. But it would look to be an external add-on possible to the side of the frame.
Cheeers
Hi Jean-Cristophe,
You could even integrate Alexa onto your Pi (no need for a separate device)!
Here’s a good tutorial on it: https://www.youtube.com/watch?v=bWzTdv5HbVU
Good luck
Do you have a wiring diagram for this?
No Wiring diagram:
But to summarise:
Pi connected to Monitor via HDMI
IR Frame connected to the Pi via USB Connection
Pi Camera connected via Ribbon cable to the Pi.
Hope this helps.
I haven’t seen any instructions on how to integrate the Alexa. In my case, I’m wanting to use a google home. How can I connect it to the raspberry Pi? And how does it connect to wifi? Where does it plug into the Pi?
Hi Amanda,
You can do this in two ways:
1) Alexa works by an indirect integration of the Pi and Mirror, I.e using Spotify on the PI would display what’s on the screen of your linked mirror to the Spotify account via API token.
2) Integrate Alexa on Pi, here’s a good tutorial on this https://www.youtube.com/watch?v=bWzTdv5HbVU
Cheers
Hey man what size two mirror did you buy?
My dimensions were (71cm x 40 cm) (W x L)
If you can’t find a pre-cut one online, You can get a custom cut acrylic 2-way mirror for this.
Hello,
When custom ordering the 2 way mirror, do I order it to where it fits the IR frame perfectly (H1/W1 or H2/W2) or should I order it to fit the entire 32 inch tv screen?
Looking at the dimensions for the IR frame you linked in your video.
Hi Kevin, I would recommend getting the mirror to fit your entire TV, ideally 1 cm larger than the TV dimension for Buffer. (H x W)
Hello,
I have a 22” screen and I can only find 24” detectors. I don’t know how the calibration works, I’m afraid the finger is not in front of the display. is it a good idea to take 24 ”?
Hi Siban,
Ideally, it would be good to get a ’24 screen to match with the ’24 it frame.
You can calibrate it, but it won’t feel as natural as a 1:1 ratio… so it can respond to what you touch exactly.
Good luck
I have written MANY module for MM and I have to say that after 5 years this is THE best tutorial I have ever seen. Well done young man!!!!!
Thank you and much appreciated!!!
On a side note: I’ve recently released a tutorial on building a DIY Robotic Arm – controlled by Hand Gestures if it would be of interest.
Cheers,
Eben.
Hi.
Awesome project! I will try to build it but i have a question:
I ordered the 2 way acrylic mirror but i was not able to find the correct size. I ordered it bigger and have to cut it. Do you know whats the best way to cut it?
And i ordered this ir frame. Is this working with the pi?
Thanks alot from germany! Paul
Hi Paul,
The best way I found is to order a custom fit two-way mirror, (to avoid cutting the mirror) I haven’t tried cutting the mirror, though you could cut it but would require some serious tools!
The IR frame works a bit like a mouse (depending on the IR Frame manufacturer) this should be compatible with not only the Pi but Windows Mac etc.
Hello great video!
How does it connect to the raspberry pi? Only using hdmi? How do you use the touch? I want to buy a touchscreen but it only comes with hdmi-in and won’t connect to the gpio. So without a keyboard how can I control using hdmi and touchscreen?
Hi Ricardo,
Thanks, you’ll connect the Pi to your monitor via HDMI. The touchscreen is an IR Frame. The IR frame works a bit like a mouse, as in a plug n’ play by connecting the USB port to the peripheral of the Pi. The Pi comes with an on-screen keyboard. Or you can use VNC viewer.
Good luck!
Do I need a touchscreen monitor for this?
The touchscreen is optional. It would pretty much be the same, minus the touchscreen interaction.
Hello
Thank you for a good build tutorial.
I am replicating your build, but I am using a 24″ monitor instead of a 32″ tv.
This gives me an issue with the Smart Touch module.
The two center buttons are positioned correctly at bottom center, but the Shutdown and Restart buttons are not hiding outside the frame limit. They are always visible and when I press the right hand center button, it moves closer to the center of the screen.
The easy way to solve this is to move the center buttons to Bottom Right, completely hiding the other two, but I would rather have it working correctly.
Is there a way to manipulate the code to move the Shutdown and Restart buttons so they are default outside the visible area of the monitor and moved in when the button is pressed?
If yes, can you please explain how?
Thank you in advance.
Br,
Espen
Hi Espen,
There’s a thread that goes into this in more detail providing the solution, ideally altering the .css file to fit your screen size:
https://github.com/EbenKouao/MMM-SmartTouch/issues/6
Good luck
This mean awesome project!
I have followed your steps and built on on a touch screen display!
One question I have is can you use google assistant or google text to speech / speech to text instead of Alexa to voice control?
Yeah sure,
Have a look at google Pi or Google AIY Hat.
https://github.com/alexa-pi/AlexaPi
https://aiyprojects.withgoogle.com/voice-v1/
Ideally integrating Google Assitant into your Pi.
Good luck
Hi Eben,
Magic Mirror is working perfectly. I installed your touchscreen module, but since I have my weather forecast on the upper right side, the menu side view is quite conflicting and covering the whoe forecast up. I was wondering if there’s a way to move it on the lower right corner. Absolute no idea about programming here, but your video made it really easy for me! Thanks!
Be
Hi Be,
Nice!
You can play around with the .css file till you get the right placement. Here’s a thread on this:
https://github.com/EbenKouao/MMM-SmartTouch/issues/6
hello i have finished the smart mirror so far. thanks for the great explanation.
In your new video you have great new touch buttons.
how did you do that?
i would like to have that in my smart mirror too.
Hi Marvin,
Awesome!
Not sure what touch buttons you’re referring to but you can find the whole git repository here:
– Features: Hide UI, sidebar
https://github.com/EbenKouao/MMM-SmartTouch
Good luck,
Eben
Hello!
What MagicMirror module did you use for integrating Alexa? I notice in MagicMIrror Builders most GitHub are outdated and doesn’t recognized nom and node.js?
I get this a lot:
pi@raspberrypi:~/MagicMirror $ npm start
npm WARN npm npm does not support Node.js v10.23.1
npm WARN npm You should probably upgrade to a newer version of node as we
npm WARN npm can’t make any promises that npm will work with this version.
npm WARN npm Supported releases of Node.js are the latest release of 4, 6, 7, 8, 9.
npm WARN npm You can find the latest version at https://nodejs.org/
sadly, I’m ok with installing everything else except for the voice activation through Alexa or Google assitant.
I used: https://github.com/alexa-pi/AlexaPi
Yeah, it seems some modules look like they’re no longer maintained.
Good luck
Interesting project and thanks for sharing!
The IR Frame you link to in section “Main Parts (Hardware components)”, have you tested this particular frame with Raspberry Pi OS (v10) and rpi v4? They state in product description on Amazon that Raspberry is not supported. I’m also curious if this frame works in vertical
Hi Ismar,
Thanks for your contribution to Git!
From what I’ve observed is supported on pi4 OS v10 and works well.
However, multi-touch isn’t supported. (pinch to zoom etc).
Unfortunately, Orientating the frame vertical is one thing that I’m yet to experiment with.
Hope this helps.
Best regards,
Eben.
hello beautiful tutorial installed everything, integrated config file, but nothing to touch on the mirror
Which IR frame are you using?
As a debug are you able to click on the touch if you plug in a mouse
Thanks,
Eben.
Hi There,
I have done everything as you have suggested but it is still not recognising my face.
I have installed everything correctly.
Changed my two pics as you have suggested.
is there any way I can debug or see more information when running the code so I can see what is going wrong?
Kind regards
Anil
For debug, try: npm start dev or display=:0 npm start
Cheers.
Hi eben, is there any tutorial on how to use alexa on magic mirror? Because on your tutorial the alexa part is missing. Thanks great video and tutorial im planing to build on my own using your video.
Hi Markii,
Here’s a solid one: https://www.youtube.com/watch?v=bWzTdv5HbVU
Good luck!
Hey Eban,
Thank you for share valuable content and tutorial for smart mirror,
I have similar project but it’s for smart workout mirror for heart failure patient, so they can workout remotely at home instead going to rehab center,
Well I have concern on how we can use rasbi Pi here? I already made touch screen work by following your instruction, but for step 6-Remove SD Card and plug in Pi. Whereby you could access Pi via VNC or Mouse and Keyboard. How this can work ? the connection is missing ?
please advise further
Looking forward to your prompt response.
Hi Fawad,
That seems like a very interesting use case. I hope this would provide much value.
Sure, was referring to VNC viewer. It’s a way of remotely accessing your Pi (similar to your computer) without a Keyboard and Mouse. Here’s a video on how to set this up:
https://www.youtube.com/watch?v=NWBmYnNvN3A
Good luck!
Hi Eben,
this is just amazing. Thank you very much for your tutorial.
I’m wondering about the sizes of the mirror.
You mentioned above that your mirror is 1 cm larger than the TV dimension.
Does it means that the mirror covers the complete monitor including the frame of the monitor?
Or does it only cover the panel itself of the monitor?
And another question about the assembly.
You used the monitor at the bottom, the mirror in the middle and the IR frame on top.
Is the IR frame applied around the 32″ monitor/mirror-panel? That means the inner size of the frame is still 32″
Or lays the IR frame on top of the monitor/mirror-panel which reduces the possibles panel size by the width of the IR frame?
It’s not really comprehensible from the picture of the three layers in your video.
Thank you.
Cheers,
Sven
Hi Sven,
Thanks for getting in touch.
Keeping the mirror 1cm larger is pretty optional. But it’s nice to have an extra buffer in the event the TV/Monitor has a large frame bezel.
This would cover the whole monitor, reaching up to the frame of the monitor,
The Layout is TV Monitor -> Mirror -> IR Frame. On top of the monitor.